Growing cacti and succulents from seed is an exciting idea. For many growers, growing from seed may be the most inexpensive way to get a highly coveted species. In some cases, it can be an ideal way to get extremely rare or hard to grow species (very common for mesemb collectors) – shipping seeds is much easier to do than shipping protected plants.
Every species of cactus or succulent has a slightly different seed, sowing preference, and growth rate. Some are much easier to grow than others, and some are nearly impossible. Your local growing conditions will also impact which species grow well for you, as will the time of year!
What follows is the rough guideline of how I handle seeds, what germinates well for me, and what I’ve learned through my own trial and error when it comes to growing seedlings. I am by no means an expert, but I have seen some decent success so far, so hopefully sharing what has worked (and what hasn’t) for me will also help you!
What I Can’t Seem to Grow
We’ll start with what I won’t cover here: most of the soft succulents. While I’ve had some small success germinating echeverias, I’ve never been able to get many going, and none have lasted more than a year for me. I’ve never been able to get the graptopetalum, sedum, pachyphytum, or other popular collector soft succulents to even germinate.
Most of my personal failures with succulent seed germination seem to be related to what happens after the first new growth, if I get any at all. I think I have yet to get the soil mix correct, and combined with my…haphazard attention… when trying to harden off my seedlings, it’s just too harsh for them to thrive.
So starting off: if you’re looking for guidance on sowing seeds from a prized Korean hybrid or similar, this is not the place for you. I haven’t figured it out yet either!

Pollinating Your Plants to Make Your Own Seed
You can make your own seed, and that’s where I got most of the seed I’ve experimented with for the years before 2021. Depending on the species, it’s fairly easy if you have a paint brush!
Some species only open flowers for a day, maybe two at best, while others will stay open for nearly two weeks. The hardest part is ensuring that your cacti (or succulents) have open, receptive flowers on the same day – which is often quite a challenge! If you only have two of a given type or species, it’s a complete crapshoot if they’ll cooperate with their flowers.
If you do get two open blooms on the same day, you can use a paintbrush, Q-tip, or sometimes even your finger to grab some pollen from one flower to smear on the stigma of the other.

Circled on the photo of a gorgeous Astrophytum capricorne flower are the two main parts of any cactus or succulent flower you need to be aware of.
The stigma, or female receptive parts, are circled in green.
The pollen (which is produced by the anthers on the stamens) is circled in blue.
If you look closely, the stigma on the cactus pictured is sort of closed up. A fully receptive bloom has the stigma splayed wide, like an open hand.
Compare the stigma above to the stigma right, which is bright red compared to the yellow of the bloom. The red stigma is nearly fully splayed open, indicating that the flower is fully receptive to pollen and readily fertilized. This is what you want to see when pollinating – dust the pollen on nice, receptive stigmas for best results.
You don’t necessarily need the cactus to be fully receptive when you pollinate, but it does work better if the flower is receptive.


You can see the stigma just starting to splay open in the bloom on left.
What I did for these echinocereus (and what I often do to pollinate, if I have the time and I’m home) is I went out when the blooms first opened, and “tickled” them with my paintbrush to mimic a bird or bug investigating the flower. When cacti feel this, it triggers a reaction to fully open for maximum pollen, as it’s an indicator that their pollinators are out and about. After about an hour, go back out and use your paint brush to pick up pollen from the stamens and liberally cover the stigmas.
For cacti species that only open their flower for one day, they seem to reach maximum “open” at a set time, rather than after some “tickling”, so your mileage may vary. If you’re struggling to get fertile seed pods, try a bit of tickling to see if your flowers become more receptive.
I learned about this from a presentation at my local cactus club, and it’s been a game changer for getting larger quantities of fertile seeds from my crosses!
I’ve had solid success using a paintbrush to pollinate aloes as well – this takes less dedication, as you simply use your paintbrush to get up into the base of the flower, coating the bristles in pollen. Then transfer the pollen to the stigma of your ‘mother’ plant, and repeat for as many flowers as are open! When I’m actively trying to create crosses, I usually repeat this at least once a day for several days until there aren’t any more flowers opening.
Gasterias/gasteraloes have similar flowers and pollination.
Euphorbias are just as easy; their flowers are more subtle, but they accept pollen readily and sometimes almost without trying.
Collecting Seeds
Your cacti will create fruit that you’ll need to collect at the right time. Some species need the fruit to be almost dried out and overripe – Notocactus seem to be in this category.
Other cacti clearly rely on animals or insects to eat the fruit and disperse the seeds, which you can usually determine by the fleshy fruit that is developed. Pilosocereus make a fruit with bright pink flesh, as do Myrtillocactus, although the fruits are quite different in size. Many Astrophytum and Gymnocalycium make fruits with white flesh, which seems to be the more common fruit interior color.
For cactus fruit, when it comes off with a gentle wiggle, that’s it, you have a ripe seed pod. You’ll usually see the fruit split open at least a little when it’s fully ripe. Once I’ve pulled the fruit off, I prefer to cut it open and spread out the insides to dry. After a day or two, it’s usually dry enough that you can brush the seeds into the envelope or whatever receptacle you have to store them.
Aloe seed pods will usually start to split at the tip, which is the ideal time to collect them from the plant and place them somewhere to finish opening. Bagging the seed pods also helps collect all the seeds before the pods explode open.
Euphorbia seeds harden into little capsules that literally explode when they’re ripe, and the best way to catch the seeds is with a net or mesh covering that keeps the seeds from spraying all over your garden or greenhouse.

A couple examples of cactus seeds. On the left is a brilliant pink fruit from a Pilosocereus pachycladus/azureus, and on the right a ready to be harvested pod from a Copiapoa tenuissima.

Sowing Seeds
First, dirt.
Find a decent soil blend, but if you can’t, you can mix Miracle Grow or similar with about 50% pumice to increase the drainage and grittiness. Lately, I’ve also been mixing in some decomposed granite, and I really like the grit and texture that about 10 – 20% DG adds to the soil. My germination rates are better this year than last, so I think the seeds like it too.
Ideally, you’d treat the soil to kill off any fungus, bacteria, or other parasites. You want nice sterile soil for growing cacti and succulents. You can do this through baking the soil at 250F for 30 min, spraying with an anti-fungal, or I’ve even heard of people microwaving the soil for a few minutes. Baking is probably your safest bet; I tried microwaving and the heat of the sand in the soil blend started melting the plastic of the containers I had the soil in.
Most of the time, I don’t sterilize my soil. This is asking for trouble, and if you have some valuable seeds you really want to protect, I’d highly recommend sterilizing your soil to protect them.
But if you have a few dozen of an inexpensive plant, or you’re learning with seeds from your garden, sterilization is kind of overkill in my opinion. This is especially the case if you have good air flow where you are sowing your seeds, are willing/able to check them daily, and they’re outdoors or close to it. Indoors and under grow lights, where air tends to be more stagnant, you’ll probably want to take more precautions.
All cacti and succulents will need a basic 3 elements to successfully germinate: pot or soil receptacle, clear covering of the pot to keep humidity high, and ideally, a way to water from the bottom (rather than spraying from the top).
Sowing Cacti
For most cacti, sprinkling them over the top of soil and then covering them with a thin layer (super thin!) of play sand is all it takes.
I’ll usually water their soil before placing the seeds, and then use a spray bottle to mist the sand that covers them once sown. After that, I try to water exclusively from the bottom until they are somewhat established.
They need bright light and warmth, so I start mine by a window that gets several hours of direct morning sun (east facing) and is still quite bright the rest of the day. I find I get much better germination rates with a seedling mat keeping them at about 80 – 85F.
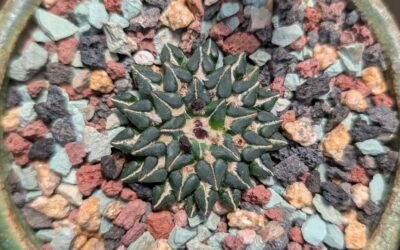
Some species will germinate in a matter of days (astrophytum, gymnocalycium, copiapoas, ariocarpus are all genera that have germinated quickly for me), but others can take weeks. Sometimes the newly germinated seedlings are so small they are a challenge to spot with the naked eye – many gymnos are absolutely miniscule when they first emerge. A jeweler’s loupe is your friend here!

Baby Astrophytum myriostigmas, about 1 week after sowing.
Sowing Aloes
Aloes do well with less of the inorganic medium mixed in – I use pretty much straight EB Stone succulent blend, with a light dusting of decomposed granite on top to help keep the seeds next to the soil.
Baby aloes like it humid, and should germinate fairly quickly. You’ll see an initial baby leaf after a few days, and this is when they are at their most delicate. You want to set up your baby aloes for minimal interference and fuss for the first few months; they shouldn’t be moved or tampered with until they have at least 3 or 4 leaves.
While I like to use a high-organic mix, many growers recommend a closer to 50/50 mix with perlite or pumice instead. I had a very hard time keeping my seedlings humid enough with that much inorganic medium, even with bottom watering or nearly fully enclosed containers. My first batches with plastic takeout containers germinated easily, but were nearly impossible to harden off and move to grow out pots.

Baby open-pollinated book aloes. I had one to two seeds per cell, and generally good germination rates. You can see that I have some issues with either fungus, or the babies getting too dry before I check on them to refill the bottom water reservoir. These are about a month old.
Nurturing Your Seedlings
Once your babies have germinated, you now begin the Long Wait.
Different species do well with varying levels of coddling or abuse, and you’ll have to research your particular plant to know what they’re most likely to want.
Aloes should be kept in their baby setup for at least 3 to 6 months, or until they have at least 3 or 4 leaves. From there, you’ll want to move them somewhere protected to continue hardening off and developing into baby plants. After about a year, they are generally established enough that you can start treating them more like your older plants.
I have seen the best success with Astrophytum by keeping them in their humidity huts for at least 6 months, until the baby plants are big and chunky enough to easily pick up with my fingers and move. When using the clear plastic takeout containers of last year’s experiments, I waited until I could see roots starting to poke at the bottom of the container, which took nearly 8 months for most. The ones I left longer in the humid conditions definitely grew quicker and plumper than the ones I pulled earlier, but there’s at least a 15 – 25% attrition rate on the seedlings I left the longest.

These are my first batch of seedlings, from 2019. They are the same size, or smaller, than the seedlings from the 2020 grow year. I moved these out to 2.5″ pots almost immediately once they germinated – I may have even germinated them in these pots.
They have been out in nearly full sun most of their planty lives, and are regularly under watered and even got hailed on earlier this year. They are still growing, but slowly.
Growing this way is commonly referred to as “hard grown”, but if I grow all of my seedlings this way, it will be decades before I have any of appreciable size.
These are some of the 2020 seedlings that were the largest in their group, and I pulled and potted them a bit early.
I used pencil to note when I sowed these, and after about 11 months, they are as you see on the right. These are in a shaded spot, but out exposed to the elements, including cold. I potted these up in January or February of 2021, and they are only somewhat bigger than their seed-mates that I kept in the greenhouse.
At this stage, I definitely have been losing seedlings to attrition from under watering, and I would consider this to be less hard grown but still not ideal.


These are the majority of my 2020 seedlings – these are all Astrophytum capricorne, rather than ornatum or myriostigma, but they seem to be more reobust than the ones that are out and exposed. They are in a 50/50 blend of pumice and soil, with a layer of pumice on top to keep moisture below and anchor the seedlings.
Most are a shade of brown or red, indicating stress, so even these seedlings would prefer more coddling.
Things seedlings need:
- Regular water, usually much more than established plants need
- But also good drainage so their baby roots don’t rot
- Bright, indirect light is best, with protection from too much direct sunlight
- Consistent warm temperatures, with nights above 55F, preferably warmer
- Good ventilation to prevent fungus or rot
Things seedlings don’t need:
- Fertilizer – it won’t make them grow faster, it’ll just lead to stretching and then rot
- Individual pots; save yourself time and space and just pot groups together
- Full, direct sun: while they might survive it, they won’t necessarily thrive (see my 2019 seedlings above)
- Frequent repotting – this will usually damage the baby roots and do more harm than good
Experiment whenever possible!
I have tried the plastic baggie method, reusing takeout containers, using new plastic containers, various seedling start trays, and have now moved to little mini start trays and large “bean trays”.
I will say so far my favorite mini container is the little green cell kits I snagged from Amazon at the start of the year, which you can see below or in the 2021 seedling photos earlier. You mostly want containers that make it easy to water from below (many seedlings do not tolerate water landing on them very well), have a clear top, and are easy for you to use.
This is my first grow season trying these longer trays, and they are working for the larger quantity of seeds I’m germinating this year. Getting the ceran wrap to lay flat and taut over the top has taken some effort, but tape and toothpicks seem to do the trick.

Germinating above, we have:
- Open pollinated Aloe striata
- Astrophytum myriostigma, variegated and normal
- Astrophytum ornatum
- Gymnocalycium andrae
- Frailea buenekeri
- Argyroderma delaetii
- Argyroderma pearsonii
- Argyroderma ringens
- Cheiridopsis pillansii
- Conophytum fraternum
- Conophytum obcordellum
- Ariocarpus retusus
- Astrophytum ornatum #68.6
- Copiapoa calderana
- Copiapoa gigantea
- Gymnocalycium pflanzii, 3 locales
- Conophytum angelicae, 2 types
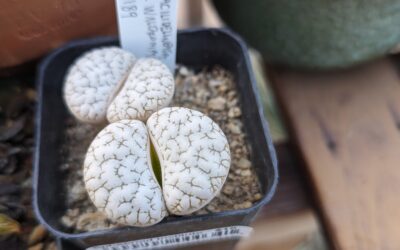
- Lithops dorothae #1573
- Lithops hookeri #1616.38
- Lithops lesliei C47
- Conophytum ectypum
- Conophytum bilobum “meyerae”
- Gasteria liliputana hybrids
- Aloe marlothii
- Aloe castilloniae “blue” hybrids
- Aloe suprafoliata hybrids
What is working well so far is nearly everything except the conophytums, although I am waiting to see if they are just too small to find with my naked eye. The various gymnocalyciums definitely emerged miniscule, and the conophytums are even smaller.
My lithops are seeing decent success, but the argyroderma are extremely sensitive to moisture falling on them. The drips from the container lids may have decimated my entire attempt.
So try! I hope this helps you set up seeds and grow seedlings of your own. The hardest part is leaving them alone for the year or two or five they often need to reach a size suitable for sale.
You can follow along for updates on my efforts on Instagram! @TrexPlants