Ah, fall. That lovely time of year here in San Diego, when we go from full summer to sort of summer.
Nights get marginally cooler.
Days are less likely to reach triple digits.
If there’s any leaves changing color, it’s the slowly crisping bushes and trees clinging to life as the dry months drag on.
September in San Diego is generally a very brown month.
There are, however, other types of leaves to look forward to.
This magical time of year is when the days get shorter – and our mesemb friends decide it’s time to wake up. Lithops and conophytums both start their growing season in the fall, generally speaking, and this is when it’s most exciting to grow them. Today, I’ll be talking about the lovely Lithops.
Seasonal In A Big Way
Unlike a house plant or ground-covering succulent like ice plant, lithops only grow once a year – and each stem only produces one new set of leaves. You get one chance a year to encourage them to produce beautiful, perfect new leaves, but they’re so gorgeous you’ll be willing to forgive them their slow development.
Their growing season starts in the fall, when they wake up from the previous dormancy period (I’ll talk about growing from seed near the end of this post). This is when both genera start doing stuff: either dividing or flowering. Which one depends on the species, but most of them seem to bloom first and then develop new leaves.
When to start watering your Lithops in the fall?
For lithops, I let them get quite dry near the end of summer. I wait for them to get wrinkled and sad, shrinking down into themselves and looking quite deflated. If it’s only a single head, they can even retreat down into the soil or show a gap between the current body and the old outer leaves. In the summer months, this sort of stress and “suffering” helps keep them compact and healthy. These aren’t plants that evolved to thrive with constant access to water, light, and “food” – or soil. They evolved to survive extremes, and do best when given at least a taste of seasonal weather.
A big way to tell if your lithops could use some water is simply to eyeball them. Wrinkled, shrunken, mildly concerning? Perfect. If it’s summer, splash ‘em.

I’ve posted before about my in-ground lithops, and they’ve served as an excellent benchmark of just how much suffering and dehydration these guys can take. Check out the one below after going through nearly 6 weeks of no water, nearly full sun, during the hottest days we’ve had so far (95 -100F), with just a cheerful “god speed” when it got hot:

I watered this hill with a sprinkler for about 60 minutes in the evening, and then checked on the lithops a couple mornings later.
Hard to believe, but this is the exact same plant:

The …benign neglect… is honestly the best thing you could do for your lithops. But, having shown just how much they can take, some caveats:
Humidity matters!
Notice that my greenhouse lithops, despite not getting watered for the same time period, aren’t as sad as the in-ground plant. I watered something in the greenhouse every week or two, but not the lithops, so each week they saw spikes in ambient humidity.
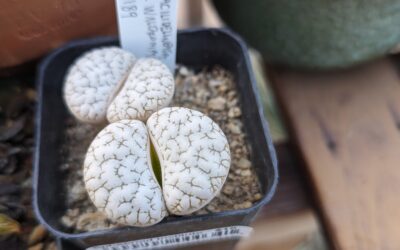
Here’s a couple of the pampered greenhouse-grown lithops:


While both are slightly shrunken, and you can see some wrinkling in the body of the Lithops schwantesii at the left, neither plant is anywhere close to as stressed as the specimen I showed in the ground. If you’re growing your plant indoors or otherwise sheltered, this is important to keep in mind!
The greenhouse lithops are also in consistent partial shade for the entire day, which impacts how rapidly they go through water – but the increase in temperature in the greenhouse (120F+) vs outdoors offsets this variable.
If you live by the coast or get morning fog, humidity has an impact on your lithops, too! They’ll absorb moisture from the air and need less water in summer months. If you get regular morning fog, or marine layer, you may not need to water at all from about April or May until around September. That’s where watching your plants to see how they look comes into play.
Temperature and its inconsistencies
All of my mesembs experience the temperature extremes of living outdoors – which impacts their growing. The more temperate the weather where you are, the less stressed the little plants will be…and the less you should water or fuss over them.
By contrast, those of us living inland and experiencing hot, hot summers will need to pay closer attention to our little plants. They need less water during dormancy, but that doesn’t always translate to “none”. Those in-ground lithops, for example, would completely shrivel away into nothing if I didn’t water them at all during summer. Some years, I’ve watered them almost every week even in summer – how did they survive? Well…

Above is one of my seed-grown Lithops karasmontana ssp. bella – if you look closely, there’s a spot of variegation on the top left of the plant!
DRAINAGE. DRAINAGE. DRAINAGE.
Most issues with moisture can be solved by improving the drainage for your plants. My in-ground lithops are at a significant slant and planted in nearly pure granite/quartz. My greenhouse plants are in a super gritty mix I make myself – 50% pumice, 25% orchid bark, and 25% soil.
If you know you’re an over-waterer, if you’re by the coast, or if you’re growing them indoors – make sure the soil is a nice, gritty, well-draining blend! It’s a lot less “soil” in the pot than you’re probably used to, and that’s ideal.

Lithops lesliei var. venteri “Ventergreen” – 2 y/o seedlings
Light for your Lithops
While Lithops are dormant during the summer months, especially with high daytime temperatures, they appreciate some shade and protection from intense sunlight.
If you pot your lithops so that they’re flush or just above the edge of the soil when they’re actively growing, in summer, there’s a good chance they’ll retreat down below the soil line. For my younger lithops, like the seedlings at left, they’ll end up covered by the pumice and soil of their pot.
And through summer…they’re quite happy that way!
In fall, once you start watering them again, they’ll plump up and peek out over the soil again.
I like to use a paint brush to gently sweep away the soil and check on the plants while they’re dormant like this, and then sweep the debris back over to cover them.
This time of year, now that they’re waking up, it’s important to be sure they’re getting enough light. Without it, they’ll start to stretch.
Remember how I mentioned they only grow new leaves once a year? That is why you want to be sure they have adequate light when they wake up. When the lithops are happy and really actively growing, they’ll very quickly display signs of stretching due to inadequate light. Below are some of my Lithops karasmontana seedlings, showing differences in growth. These are kept on the same shelf outdoors, same shade, but one gets more direct shade from something else casting a shadow while the other is only sheltered by 40% shade cloth.

Even with the bottom plant being visible mostly head-on, you can see that it’s not nearly as tall as the one at the back. Both are awake, actively growing, preparing to either divide or bloom – but one hasn’t had enough light, and it’s reaching for more.
If your Lithops at home look like the one on top right now, in the fall, before they’ve split – it’s not good, but it’s fixable. You need to move it to a brighter exposure (gradually, over several days, not all at once!) and make sure you’re not giving it more water.
In this stretched state, they’re a little trickier to maintain, but the brighter exposure will ensure that the new leaves that emerge will be compact, dense, and growing in a healthy shape.
Growing Lithops from seed
This time of year is also the perfect time of year to start trying to grow your own lithops from seed!
I sow seeds starting in late August, and will continue to sow new seeds every week or two until October (or I run out of seeds or room to put pots).
Step by Step sowing guide
Preparing your soil
My soil mix for seeds is nearly the same as for my established lithops, but with some minor ratio changes:
I’ll fill a small 2″ square pot with that mix, then put a thin layer of rich houseplant soil on top. I use the happy frog blend because it’s what I have on hand, but don’t sweat too much about looking for something with beneficial microbes etc in it…because your next step is going to murder it all.
Boil a big pot of water, and once it’s at a nice rolling boil, slowly pour it into each pot you plan to sow seeds in. I keep my seedling pots in a big seedling tray, and make sure to get some water in each pot, and they all sit in the scalding hot water. Pour slowly, in small amounts, so the hot water can kill off potential fungus or bacteria in the soil but there’s not enough to melt your plastic pots!
Then, let the pot(s) sit in that hot water until it cools to room temperature or at least cool enough to touch the pots comfortably.
While that’s cooling, get a container and grab some play sand. You can get a big bag from Home Depot or Lowes, or if you don’t need nearly so much, something like this sand from Amazon can work. Do not use kinetic sand or dyed sand; you want something without additives and fairly translucent. You’ll be using this as a top dressing to layer over your seeds when you sow them.
Sowing the seeds
There’s two approaches to sowing: the diligent, careful way, and the chaotic way.
The careful way is to open up your seed packet and use tweezers or a damp toothpick to place each seed precisely where you want it, in tidy rows. I do not have the patience for this.
I instead will carefully open the packet, then turn it over the pot, and gently tap the packet to sprinkle the seeds over the pot. Any that are left, I’ll use a toothpick or a pencil to gently unstick them from the packet and tap them into the pot.
Once they’re all sprinkled over the surface of the soil, I’ll take a scoop and sprinkle a very thin layer of sand over the top.
The final touch is to take a piece of seran wrap or clear cling-film just barely bigger than the top of the pot, and I’ll tape it over the top to create a humidity chamber. Place the tray in a bright spot – I use a corner area that has two windows that get direct morning sunlight for several hours early in the day.
Then…you wait!
Keep water in the seed tray so the soil doesn’t dry out, and check them daily.
You should see fresh lithops seed germinate within a week. Nearly every species I’ve grown has sprouted little green bodies within 7 to 10 days of being sown. I let them sit with the seran wrap over the top for a couple days after seeing green, but then I take the plastic off and let them exist in the open air.
The next step is tricky, and depends on the weather. If it’s scorching hot out (90F+ during the day), I keep them indoors until daytime highs get cooler. I try and wit for a few days until some cloudy weather is predicted, or the daytime highs are only in the 80s, and then I’ll move them out to my greenhouse early in the morning.
I move mine out very quickly, as I have no artificial lighting indoors for them, and they stretch very quickly. In the photo below, you can see some stretching in the pot of seedlings to the left of the center pot.

This is an ideal time of year to sow your little lithops, as there’s enough time before winter for them to grow and divide once – at which point they’re cared for much like the adults.
You can see some round little balls in the pots above – that’s Osmocote, a slow-release pellet form of plant fertilizer. This year I’m experimenting with adding it in early on, but I’ve used it regularly with my various seedlings of many species to get them boosted and to a sturdy size relatively quickly.
You don’t want to overdo it; they don’t need a ton of extra fertilizer, or even any at all if I’m honest. I’ve grown seedlings without any extra food in the past. But…they do get to a size that’s hardier and resilient much faster if you feed them as seedlings.
What I’ve done in previous years is fill up a spray bottle with my favored 20:20:20 fertilizer at a very weak dilution. I just sprinkle some into the bottle until the water is a very pale blue, and then mist the seedlings every couple days until they get big enough for their first division. I keep the seedling tray always full of regular water, add fertilizer on top.
You should see them divide for the first time within a month or so, at which point, you can stop fertilizing them. Once they’ve divided that first time, they basically become miniature versions of the mature plants, and need less diligent care. They should no longer be sitting in the water tray, and can be watered from above with much less fear of disturbing the delicate baby roots.
Enjoy your Lithops!
It’s fall and it’s when they wake up – have fun! It’s a great time to repot your plants, if you need to, as they’ll have their entire cool weather growing season to adapt to the new soil.
It’s also a great time to order them online, as they’ll be eager and ready to start growing for you. Naturally, I have a bunch of my seed-grown plants available, but you can also hunt for the exact species or clone you’re dying to have on Etsy or through eBay.
In short – it’s a great time of year to grow lithops. If you don’t have any yet, give them a try!