I picked up this plant as a young, established specimen during sort of peak COVID plant craze – around September 2020. A friend who was into the rare tropical plants had reposted the starts to his own story on Instagram, mentioning that they were a good price, well established, and that they did well even in cold weather. I was looking for something to go in a specific area outside, and picked it up for $100.
As a young plant, it was…underwhelming, I’ll admit. I set it up, eyed it, and wondered at myself for falling victim to peer pressure over a fairly standard plant.

The plant when I first received it, mid September 2020.
I honestly didn’t do much with it for a long time. It got potted up into a terra cotta pot roughly the same size as the black gallon pot it arrived in, and there it lived for a few years.
Once I get to how it looks now, I’ll talk through the care for it, light exposure, and watering – it’s an extremely hardy plant! But I’m assuming you want yours to thrive and grow quickly to an impressive specimen, not languish halfway there like mine did before this year.
It did alright in the pot, although it did suffer a bit from my haphazard care. I didn’t always water it consistently, I often forgot to fertilize it, and it would regularly get overexposed to sunlight. I included it in my early blog post about spider mites with an example of a yellowing plant that didn’t actually have spider mites – but it did get them about a year later.

1 year later, early September 2021.
Between battling spider mites, scorching the leaves, and chronically under-watering the plant during a really stressful year, I have no photos of the stenolobum from 2022.
It just carried on, unfazed. It went from “eh, this is just a green-leafed philodendron, I don’t get why this was so expensive when there’s so many like it” to “okay, this is pretty cool.”
And then the leaves started getting bigger, and that started to really win me over.
Yes, I absolutely bought the plant knowing nothing about what it would look like as it got bigger. Don’t pretend you were any better than me in 2020. It was crazy times.

The beginning of looking good – February 1, 2023
Your eyes may spot that the white terra cotta pot is still there – so yep, it had been in the same pot for about 2 years. You can see some of the sunburnt and damaged leaves, but the newest leaves are pretty, and getting the ruffles along the edges that are typical of mature Stenolobums.
Later in 2023, I potted the Stenolobum up into a 3 gallon pot to give it room to grow. I was hoping for it to continue to make big pretty leaves, and to get more bush-like. It didn’t really do that in the place I had it, but it did start making increasingly larger leaves.
By 2025, I repotted it again, and it’s been thriving. It’s honestly done well no matter what I’ve done to it, but the 2025 set up has been where it’s done the best. With that, I’ll detail soil, light, and how to encourage yours to grow quickly to impressive size!

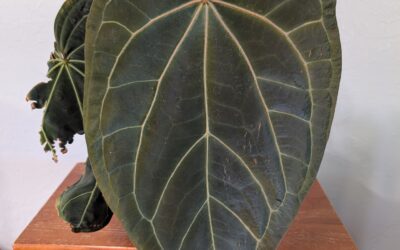
Thaumatophyllum stenolobum, July 29, 2025
Habitat
Thaumatophyllum stenolobum was originally described as Philodendron stenolobum, and is native to Brazil – specifically the state of Espírito Santo.
I found references to it being described in Kew, Plants of the World Online, and found the issue of Aroideana where it was first described back in 2002. Early on, it was considered part of Philodendron williamsii, but it ultimately had enough differences to be considered unique.
The article describing it notes that it was widely sold as an ornamental plant, and often under the name Philodendron “Espirito Santo”. I share this as an interesting tidbit – I think back before the plant craze of COVID, the name wouldn’t have held the same magic as the extremely rare and narrow leafed Spiritus Sancti does now. They’re not the same! They just come from the same place in Brazil.
Cultivation
Light
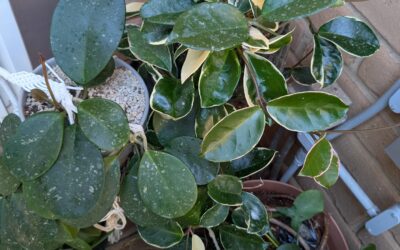
Delightfully, growing this plant is pretty easy if you have areas with lots of bright light. If you’re worried about growing these, try growing some Monstera deliciosa and see how one does in the spot you’re thinking of. Space at a premium, and you only want one giant plant? Try some hoyas and see how they do – you can see some of mine sharing the space with my Stenolobum. If your hoyas blush a little dark, with red or pink hues, then that’s a great sign of enough light.
Indoors
When I’ve had mine indoors, it’s been by a south-facing window and getting as much light as possible. I did move mine inside for a while to try and admire it as a houseplant, but my conditions weren’t as ideal as they could be.
You, however, may want to try harder than I did to keep yours inside. That can definitely be done!
You’ll want, and need, a dedicated grow light where this plant is the star. The Sansi lights work well, even if they’re a little ugly, but they’re budget-friendly for their quality. You can also put grow bulbs into a nicer looking floor lamp to disguise it and have a nice looking statement piece.
Set it on a simple timer for 12 hours of light, and you should be set.
Outdoors
These are extremely easy-going when it comes to light outside. Anywhere works, as long as it gets some light outside of the middle of the day. Morning light is ideal, but I had mine in a spot that received afternoon light and it also did fine. With afternoon light, you’ll have to be more cautious.
For morning light, the Stenolobum can have up to 4 hours of direct light if it’s early morning and becomes shade before the hottest time of day.
If it’s afternoon light, especially during hotter months, you’ll want to have it in a shadier exposure where there’s only an hour or two of direct sun at most. Once the plant is accustomed to its placement, it can tolerate a surprising amount of heat and light without scorching – it just needs to be slowly adjusted to the light.
Compared to plants grown in more shade, though, the Stenolobum is somewhat hardier about the transition. In the photo at right (from September 2025), you can see my hoyas with severe sunburn thanks to a move from a shady corner to a spot with more sun. The Stenolobum? Absolutely no change. I’d still be careful moving yours from indoors to outside, but once acclimated, it should be smooth sailing.
Water
For a tropical plant, I find it as forgiving as a mature monstera deliciosa to water.
Like I said, I keep mine outside for the most part, so it’s well-ventilated and subject to seasonal changes. It gets pretty dry in hot months, and sometimes the only reason I remember to water it is because I see the leaves drooping.
Watering thoroughly only once the soil is dry seems to help prevent rot, mold, and other issues with soil or pests.

September 10th, 2025
In winter, it’s a free for all. In North County San Digo, you embrace the free water falling from the sky when you can! At least, I do. Our rain tends to be acidic, which is great for flushing my potted plants, as our tap water trends to the alkaline side.
Acidic water does help with nutrient absorption for your plants, but it’s far easier to manage without trying to tinker with your water pH every time you fill your watering can. For Stenolobum, the plant absolutely doesn’t care. Embrace some acidic rain if you also have alkaline tap water, and if you don’t, then don’t sweat it.
When growing these indoors, take care to ensure its able to dry out before you water it again. Avoid keeping them overly soggy or sitting with wet feet (where there’s water sitting in the saucer that the pot sits in). If you’re feeling brave and you know you’ll be paying enough attention, you can even let it go long enough to see leaves starting to droop before you water. That’ll help you gauge how long it really takes for the plant to get sad, although I wouldn’t recommend waiting that long every time. If you do let it get that droopy, I strongly suggest a shower or watering it outside so you can spray all the leaves down and really saturate the soil.
I water my Stenolobum roughly once a week during the hottest time of year, and maybe every two or three weeks the rest of the time. When it’s over 100F, I check things daily and water more often.
Below, you can see my Stenolobum in the early stages of looking thirsty during the hottest time of year. Notice the leaves looking folded and extra wrinkly? Compare those to the leaves in later photos.

First repotted, August 17th, 2025, next to my very sad and beat up Monstera deliciosa albo after a trim.
Luke the Dutch Shepherd for scale.
Fertilizer
You can go fancy with foliage feed and fish emulsion and all kinds of tinkering with the soil, but I think it’s overkill. I’ll go over the soil in the next section, as I think that’s far more important, but fertilizer doesn’t need to be fancy or over the top. I’ve been using different types of fertilizers since before COVID, and honestly in the last 6 years, I’ve come to the conclusion that what works best is what you can apply consistently and ticks most of the boxes.
For that, I use two main types of fertilizer: the blue powder, or Osmocote.
The blue powder is Jack’s 20-20-20 water-soluble fertilizer, which ;is also what I use at half-strength for my cacti and succulents. When I give it to the outdoor tropical plants, they basically get the leftovers from the cacti, so it’s often at half strength for them, too.
Osmocote is a slow-release fertilizer, and comes in little granules. I prefer Osmocote over the houseplant sticks because it’s way, way easier to sprinkle it on top of the soil and keep up on it. The fertilizer sticks can work too, but many of the tropical plant species I like to grow love to get root-bound, which makes shoving the things into the soil nearly impossible. I feel like I get more bang for the buck with Osmocote as well.

Everything in that corner looking happier after a couple months – October 25th, 2025
Soil and Potting Your Stenolobum
Drainage is an important part of potting up your Stenolobum, and there’s no single pre-made bag of potting soil mix that I’d recommend on its own as an ideal fit. If you want it to thrive, you’ll need to mix up some soil of your own to get the right drainage.
As ever, there’s 3 main ingredients I use for my mix: soil, orchid bark, and pumice. The ratios change based on the size of the plant. Seedlings and small plants benefit from more soil, maybe even some moss in the mix, to help the baby roots stay moist. As the plant gets older and larger, with large, thick roots, a thicker and chunkier mix is more suitable.
It’s important that your mix is chunky and has particles of differing sizes (making it heterogenous), which allows for airflow and roots to get around in the mix. It helps keep the soil from packing down too tightly, and getting so tightly packed that water can’t get in.
I am strongly in favor of mixing both pumice and orchid bark in my soil, as the two materials serve different purposes while also helping keep the soil heterogenous and varying in size and texture. Pumice ensures airflow and can hold on to nutrients and fertilizer a little longer. Orchid bark holds on to moisture longer without being soggy, but it’s also extremely irregular in shape, which helps prevent the soil from getting packed down.
In smaller pots, my mix is roughly:
- 50% quality houseplant soil, such as Fox Farms
- 25% small chip orchid bark (if you can get it; medium chip is fine if not)
- 25% horticultural pumice
I consider a “smaller” pot to be 1 gallon or smaller. My Stenolobum arrived in a 1 gallon, so I’ve never really encountered them in anything smaller, so your mileage may vary if you’ve got a smaller seedling.
For the big pot, I went with the same mix I use for my big Monsteras:
- 25% cactus & succulent soil (I use E.B. Stone)
- 25% houseplant soil, such as Fox Farms
- 25% medium/whatever I have orchid bark
- 25% horticultural pumice
I switch to including cactus & succulent soil as it isn’t as rich as houseplant soil, and tends to drain better. It’s also cheaper, so for the giant pots, it’s more cost effective. I can make up for the lack of nutrients with fertilizer, and in those giant pots, it’s not like I’ll be refreshing the soil all that often if I can help it. The benefits of a high quality houseplant soil start to lose out when you’re considering long-term maintenance in a giant pot, so I really tend to include it more for the mycorrhizae and initial boost than for anything else particularly long lasting.

December 27th, 2025 – newest leaf after some rain
How to get those giant leaves:
The newest leaf on my Stenolobum is just over 2 feet long, and each leaf has consistently been bigger than the one before. I’ve noticed a few trends that led to either consistent leaf size or larger leaves.
When leaves grew consistently the same size, that was a sign the plant had maxed out the size of the pot it was in. Those early pots from a couple years ago, when I didn’t repot it for a couple years? Those leaves tended to be nearly the same size each time, even if they were pretty. They might have come out a tiny bit bigger each time, but it wasn’t by much. Fertilizer helped new leaves come out shiny and large, and so did water, but neither one had as much of an impact as repotting into a larger pot.

Luke for scale, December 27th, 2025
You can’t just plop a small plant from a 1 gallon pot into a 10 gallon tree pot, though. It needs to be appropriately larger than the pot before it.
When graduating my plant from pot to pot, I went from 1 gallon to 3 gallon, and then up to what it’s in now – I think a 7 gallon pot. For some plants, that much of a jump (from 3 to 7 gallons) might have been too much, but after several years I knew how fast the Stenolobum would grow outdoors and during hot summer months.
Timing for the repotting is also crucial. If it’s cold out and the plant is barely growing, that’s not an ideal time to repot it, no matter how much you might want to. Wait until the weather is starting to warm up to encourage it to really grow into the new pot.
And yes, the time between repotting it and those big, gorgeous new leaves was really only a few months! To wrap up this post, I’ll put the two photos of the plant with Luke for scale below to highlight just how fast the plant can and will grow if you keep it happy. Enjoy, and good luck! Mine has not bloomed yet, but I’m hopeful with these enormous new leaves and all the growth that I’ll see blooms in 2026.
Above, end of August, 2025.
Right, end of December, 2025.