I’ve waited a long time to write about these, despite having grown them for the last 5 years and selling more than a few of them on my Etsy shop. They have a reputation for being hard to grow and finicky, something I experienced myself with the first couple I tried to grow at home. They are not very forgiving of conditions that keep their roots soggy, but have been remarkably forgiving of sunburn, under watering, and general neglect. If you’re looking for a cactus you can pot up, and then forget about, and have it still look beautiful – I’d say give these a try!
Ironically, as I went through my library of plant photos to find one of this species with a cephalium, I couldn’t find one – even though I’m certain I’ve seen at least a couple at the cactus shows. My only excuse is extreme jealousy over the plants with big hats, and I didn’t take photos out of envy.

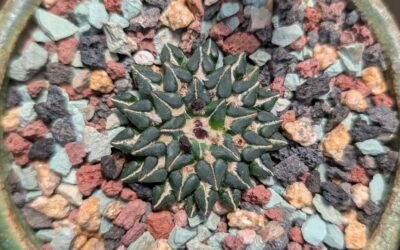
A Melocactus concinnus in my greenhouse, the only Melocactus with a cephalium I have!
What’s a cephalium?
All melocactus have a trait in common: they develop a cephalium once they reach maturity. It’s where their flowers emerge from, where fruits are made, and once the cephalium develops, the plant body doesn’t get any bigger.
The cephalium, on the other hand, will continue to grow in height over the rest of the life of the plant.
It’s made up of wool and bristles, primarily, and can take a range of shapes, sizes, and colors. While melocactus are well known for the “hat” type of growth, other species will produce them too! Some species produce a “lateral cephalium”, which is a fuzzy, wooly growth that goes along one side of the cactus. I’m hoping my Austrocephalocereus estevesii produce some for me soon!
Where is Melocactus azureus from?
These attractive little blue cacti hail from a small area in Brazil called Bahia. While the state of Bahia is actually quite large (comparable to the US states of Arizona or New Mexico), they are limited to the north and center areas of the state. Additionally, they grow best in areas that are prone to development and habitat loss, so they are threatened by habitat degradation.
Fortunately for us, they are apparently extremely easy to grow in large quantities from seed, evidenced by their large scale appearance in nurseries all over the US. I found them at my local wholesale nursery outlet, available to purchase by the flat! I assume that these, similar to my Melocactus concinnus, are self-fertile and produce fertile fruits even when grown without other Melocactus around. Of course, I have none of these species with cephaliums yet, so I can’t tell you with any authority! It’s worth a shot if you’ve got a mature plant, though.
Potting Your
Melocactus azureus
There’s a few elements to consider when potting your Melocactus, and first and foremost, you need to keep in mind that they have utterly lousy root systems. They grow in low-lying outcrops of limestone in the wild, while also receiving more rainfall than typically expected for a cactus. Seeing them labeled as “tropical cacti” can be very deceiving in terms of their cultivation, however, and might be part of why they’re considered so challenging to grow.
If you think of them as a “tropical” plant, you’ll struggle! They’re still a cactus.

Soil and Pot Size
Because these cacti have notoriously small or flimsy root systems, it’s usually recommended to only pot them in a pot one size up from their current pot. In practice, this means a 2.5″ plant should be potted up into a 4″ pot, 4″ pot to a 6″ pot. It’s rare that you’ll need a pot larger than 6″, as these cacti just…don’t get that big. Large specimens may reach 7″ in diameter, but you shouldn’t immediately take your 2.5″ or 4″ potted plant and immediately plop them into an 8″ diameter pot in hopes that your cactus gets huge.
Pot them up slowly, increase pot size gradually, and just expect it to take time. A lot of time.

My beloved variegated Melocactus azureus on the greenhouse bench, September 2023
Having just described how lousy their root system is, I haven’t experienced them to be as bad as some internet articles will say. When you pot them, you’ll just need to be aware of the best time of year to do so: late spring and early summer, when days and nights are both warm and getting warmer. You’ll want to give your Melocactus plenty of time to recover and put out new roots.
When you repot them, do so with dry soil, and keep it dry for at least a week after it’s in the new pot. This allows the roots to callous over and heal, and prevents rot.
It’s not a death knell to repot them in winter or in a less ideal time, especially if they’re fresh from the nursery and potted in dense nursery soil. If you found one at a big box store, it’s not in ideal soil for home growing, and should be repotted.
Soil for your Melocactus azureus
If you’ve read my blog for any length of time, this is going to come as absolutely no surprise: these do excellent in a well-draining, highly inorganic soil mix.
I pot these with a bit more orchid bark, as a nod to the more humid/tropical-leaning climate they’re from. Considering their small, fibrous roots, a higher inclusion of orchid bark keeps the soil mix airy but still offers moisture for a longer period of time than a mix with a higher amount of pumice.
When mixing up the soil, my rough mix for these is this:
- 5 scoops pumice
- 4 scoops succulent soil mix
- 4 scoops orchid bark
- 1 scoop house plant soil
If you’re ordering your soil online, and considering Bonsai Jack’s or a similar highly inorganic blend, I’d adjust:
- 4 scoops Bonsai Jack’s (or similar)
- 1 scoop orchid bark
- 3 scoops houseplant soil
These do need some organic matter in their soil for those flimsy little roots, and too much of an inorganic mix will dry the roots out too much and kill them slowly.

You might be asking “why the inorganic mix when Home Depot or Lowe’s sells them in that coconut-fiber dense soil mix?”
The reason is how the large-scale nurseries grow: they’re out in large covered greenhouses, and the soil is flushed through regularly. The water flushed through has fertilizer and other additives at low doses, potentially chemicals to encourage root growth, anti-fungals, and pesticides. The water systems used in these large scale grow operations allow for additives to be easily added to the water on a schedule, so not all additives are necessarily present all at once.
Once they get to the retail location, they aren’t given the same treatment, and the longer they stay at the store, the more likely they are to rot, get pests, or otherwise decline. When I sold these on Etsy, I had them priced to move relatively quickly, and let them get quite dry before I’d water again – even with that, I still had some loss due to rot.
They don’t like soggy roots!
But short term, to get them through to a better time of year to repot, they can tolerate less-than-ideal soil long enough if kept on the dry side. If you’re unsure, keep it in the pot from the nursery, wait at least a few days longer than you think before watering, and then plan on repotting in spring.
Watering
Melocactus azureus
If it wasn’t clear by my earlier comments, they need less water than you might think, given their frequent online description as a “tropical cactus”.
That doesn’t mean they need to be kept as dry as a mesemb, though! They do like more water in hot summer months, especially if kept outdoors to experience summer highs.
My early cacti, kept outdoors before the greenhouse, were watered once or twice a month during the warm parts of the year (nights above 50F). During heat waves, I’d water more often – maybe once a week? More, if it was over 100F as a high for more than a couple days.

My variegated Melocactus azureus showing the scarring from some early sunburn after getting too much sun when I first brought it home.
Now that these cacti are in my greenhouse, I water them more often. In summer, once the greenhouse is hitting over 100F every day, I’ll water them every weekend. In spring, when it’s more moderate, it’s every two or three weeks, which is how I’ll taper down in fall as nights start to get cooler.
In winter, you should keep them dry! This winter, I stopped watering in November, and have just splashed my summer growers (including these Melocactus) a time or two when we’ve had particularly warm and sunny days. It’s currently the end of January, so that’s 3 months now without a heavy watering! They are fine and this is what they need to make it through our coldest months.
Regarding low temperatures, my Melocactus azureus, including the flats I’ve kept to resell, have all done just fine with air temperatures dipping to 30F if kept dry. For my sale plants kept outdoors, I have tied tarps over my racks of plants to keep them dry during winter storms! In the greenhouse, life is easier: just keep them dry and don’t worry.

Melocactus azureus variegata
Light Exposure for Melocactus Azureus
I prefer to grow mine with shade during the peak summer heat and sunshine, protecting their powdery blue bodies from sunburn. With Melocactus species, you don’t get the same opportunities to grow out the scarring or sunburn that comes from imperfect placement. As a result, I lean to conservative, although not everyone does. With smaller plants that still have years of growing ahead of them, you have more room for error (as with my variegated plant, which scarred pretty heavily as a little 2″ seedling).
In the greenhouse, I have these positioned near my Copiapoa for decent sun exposure, but the same protection with shade cloth for the hottest part of the day.
Indoors, you’ll have a hard time if you don’t have extremely large windows or supplemental lighting. In winter, if you’re bringing them indoors, they’ll likely be fine to just be kept dry and cool near a window. If they need to be indoors year-round, you should probably test your light set up and intensity with a light meter or sacrificial, less-beloved plants before attempting it with these. They won’t show you obvious signs of distress: if there’s not enough light, they tend to just rot before you see them develop the stretching that other species do.

There’s 6 months of difference between this photo and the nearly-identical photo of these cacti earlier in the post!
Should you fertilize these cacti?
I do feed my Melocactus azureus, but I don’t worry about it much. They’re slow growing! They don’t need a lot of food, especially if you’ve repotted them in the last year.
When I do feed them, I use my typical 1:1:1 balanced fertilizer at half strength. I’ll water the cacti with it and feed them a few times once their growing season is under way, and may feed a few more times as summer goes on. Once days start to shorten, though, I pull way back, and even if it’s still hot in September or October, I won’t fertilize anymore at that point.
When you first repot them, the fresh soil is all the fertilizer they need. In a more inorganic mix, they’ll need more additional food.
Grow a Melocactus azureus!
Despite their online reputation, they’re not as challenging to grow as they might seem. Give them some well draining soil, pot em up, and leave them alone! I last repotted mine 2+ years ago, and none of them look like they need an upgrade anytime soon. They form somewhat dense root balls with small roots, and seem to enjoy a little bit of under-potting.
If you find one at your local big box store for a reasonable price, it’s worth giving them a shot! And don’t be dismayed if you kill your first one. Or two. Or even three! I went through at least 3 before finally having success with the regular Melocactus I currently have, and my variegated specimen was picked up only a month later.
For me, the trick was shelter from rain, and repotting the cacti I intended to keep into new soil. Any cacti I tried to keep more than 2 or 3 months in original nursery soil inevitably rotted.
So…try, and try again. Or try, but after you’ve grown another, less finicky species, and know you can grow it without the cactus stretching!