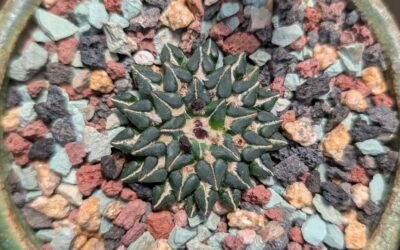
These small little cacti are extremely popular for how small they stay and their complete lack of spines. They grow in a single, small globe shape, with their growing and blooming season in summer. Grown well, they are rarely more than 3” tall, and can get as wide across as 6”.
Their care is straightforward on the surface, but many growers find them surprisingly challenging to grow.

Potting your Astrophytum asterias
These small cacti need small pots, but not too small – generally only slightly larger than the cacti are around. The pot should be taller than you might expect: the asterias grown on their own roots can have a surprising amount of roots, with a main tuber or tubers of tap root that are thick and turnip-like.
I have the best success with mine in simple 4” plastic pots, or similarly sized terra cotta pots. My oldest plant is in a 6” azalea pot, and last I repotted it, the roots had completely filled the pot! I recommend trying to stay smaller if you can, however, as the plant in the larger pot is overgrown.

The soil must be very porous and well-draining. I prefer to mix a good pre-made succulent soil mix with about 50% pumice – the pumice doesn’t float to the top of the pot like perlite tends to, and ensures a nice airy mix that the roots love. If you are a chronic overwaterer, consider increasing the pumice ratio even further, up to 75%.
Watering your asterias
The trickiest part of growing these is watering, which is heavily influenced by how you have them potted. The more organic material in your mix (such as pure miracle grow, for example), the less often you should water, while more inorganic material (such as pumice) means you can water more often.
They need far less water than you might think, and in my experience, this is the hardest part of growing them.
In summer, their active growing season, watering can be regular but should not be often. The pictures of plump, round asterias you often see? Typically overwatered or young plants. Well loved, well-cared for asterias are prone to dying young (according to the internet), and to extend their life, a bit of benign neglect is ideal.
Water sparingly during the months with nights above 50F, watching carefully for the cactus to show signs of deflating somewhat, or getting a starfish-like shape. This is an indication that it’s using internal water reserves and is ready for a drink. If you’re in a mild microclimate, this may be as little as once a month! That’s okay.
In winter, while nights are below 50F, avoid watering at all. If growing outdoors, bring under eaves or sheltered so that the cactus doesn’t get rained on. If you have a particularly warm day or few days in a row, a light sprinkle would be appreciated by the plant, but don’t sweat if you miss it.
Should you fertilize your asterias?
The less organic material in your soil mix, the more fertilizer you should expect to provide your Astrophytum asterias. That being said…they don’t need much!
I’ve seen the most consistent blooming and robust growth with a balanced 1:1:1 fertilizer at half strength used about once a month. I grow mine in a greenhouse, and during peak summer weeks when the greenhouse is over 115F every day, I may fertilize as often as once a week! I don’t do this for more than a few weeks, however, and it’s important to note I use a highly inorganic mix with my cacti. I offer more fertilizer in high temperatures and long summer days as that’s when the cacti use the nutrition most!
If you are growing in more typical patio or outdoor conditions, fertilizing once a month during summer is more than enough.
In winter, you shouldn’t be fertilizing them at all, because you shouldn’t be watering them! If you do provide a light winter spritz for unusual warm stretches, you shouldn’t include any fertilizer when you do so.

Light exposure for asterias growth
Depending on the high temperatures where you keep them, the light preferences for this cactus vary. In cloudy or mild coastal areas, you can keep them in pretty much full sun and see good growth, with some sun-stress darkening of deep green or even reddish-brown blushing. The further inland you go, the more likely you are to need to provide shade during the hottest part of the day, or risk scorching.
Typically, the concern is over too little light rather than too much. These are not well suited for indoor growing unless you’re able to keep them in a south facing window, and are willing and able to provide supplemental lighting when the sun is not in view. It is certainly possible to grow them indoors – many in colder climates do – but here in San Diego, if you have the opportunity to grow them outdoors in nearly full sun, they will do much better for it.
Pollination, Seed Collection, and Germination
While these can be relatively short lived for a cactus, one of the most delightful aspects of growing them is how easy they are to breed and grow from seed! The easy nature of pollinating and germinating seeds, and that they reach flowering size within 3 to 5 years, makes them ideal candidates for selective breeding for unique characteristics.
Pollinating your Astrophytum asterias
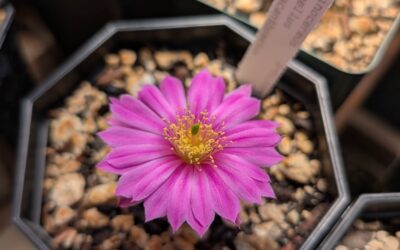
These little cacti start blooming in spring, and can continue through summer if kept watered (but not overwatered!). You’ll need at least two to get fertile seeds. The flowers are ‘perfect’, as in they have both male and female parts, but they can’t fertilize themselves.
I use a paintbrush to dust pollen from one flower to another, repeating at least once a day while the flowers are open, sometimes two or three times during midday to get as complete a pollinated flower as possible! Repeating the pollination effort an hour or two after first dusting pollen is a trick I learned from a club workshop pre-COVID; many cactus flowers become more receptive to pollination after being initially stimulated.

Some growers see success by using tweezers to grab the tiny stamens from one flower, and placing them on the stigma of the one they intend to pollinate. This has worked for me as well, but my entirely arbitrary personal preference is to use a paintbrush.
Collecting and Preparing Seeds
I will be the first to admit I can’t remember how long it takes for my pollinated flowers to become seed pods, but I want to say it’s as quick as a month or two.
You’ll know they’re ready when a gentle wiggle or tug dislodges the fruit. With practice, you’ll get an eye for seeing that they’ve ripened without even needing to tug on them. Ripe fruits range from a greenish hue to gray-red, and the seeds are big, glossy little nuggets within.
I find it easiest to collect them by opening up the fruit, and scraping out the flesh within onto a paper towel. I let them dry, and then use tweezers to carefully pick them up afterwards for sowing. If you’re as forgetful as I am, using the paper towel to dry them also means you can write what the seeds are directly on it!
When dry, the seeds can be carefully scraped off into a paper envelope, and kept for a year or more. Longer periods of storage tend to result in lower germination rates, but even my 2 or 3 year old seed has tended to germinate at 50% or better.
Sowing Your Seeds
To grow Astrophytum asterias from seed, you’ll need appropriate soil, and ideal conditions for the young plants.
I use a mix that is nearly identical to my regular potting mix, with 50% pumice as the base. I add 25% succulent mix, and 25% houseplant potting soil, with a scoop or two of decomposed granite into my mixing bucket. I use the houseplant potting soil for the added organic material, and for how well it hangs onto moisture. I typically mix up my soil in a bucket, fill a 2” or 4” plastic pot with the mix, then add a very thin layer of the houseplant soil over the very top. This gives the seedlings a nutrient-rich soil right where their roots will need it, with high humidity and moisture retention, but the bulk of their growing medium is the type of well-draining mix they do best in.
Once I have a few pots (typically a tray worth) full of soil, I’ll get a large pot of water boiling. I then use a ladle or measuring cup to distribute the near-boiling water into each pot, ensuring all the soil on top has been dampened by the scalding water. This kills most, if not all, of the bacteria or fungi in the soil that can kill the tender seedlings. This is significantly easier if you have a kettle; simply fill it, let it start to whistle, and then pour over each pot.
I’ve heard you can also bake your soil to sterilize it, but this tends to upset my partner and makes the oven smell. As an avid cook, I’d rather cook food than dirt in the oven, but it’s up to you! You can similarly microwave your soil, but you’ll want to be sure to use a glass container. I find it challenging to sterilize enough soil in an oven or microwave for more than a pot or two of seeds, but it can be done. If you do go this route, you’ll still need to thoroughly saturate the soil afterwards. For this reason, I prefer the boiled water method – thoroughly saturated and sterilized in one step.
Let the soil cool, and once you can comfortably stick a finger in the dirt and it’s at most, warm to the touch, you can begin sowing!
If you’re a very diligent, perfectionist type of seed-sower, you can use tweezers to diligently place each seed. I am more of a chaotic type, and tend to simply use my fingers to sprinkle the seeds over the surface of the soil.
For your initial sowing, you can go fairly dense. I use 4” square pots and will sow 20 – 30 seeds per pot, expecting to re-pot them after the first year.
Once the seeds are set on the soil, a light dusting of something to “set” them helps keep the seedlings stable as they first grow. I use a scoop of clean, dry play sand in a very thin layer. If your soil is adequately wet, it’ll darken the sand almost immediately. If uncertain, err on the side of too little sand than too much; you should be able to see the soil beneath the sand, or even see spots of soil through the sand due to how thin the layer is.
Last, my favorite method for creating a humidity chamber is to cut a piece of Saran Wrap and use scotch tape to keep it taut over the top of the pot. This is a crucial step that is important not to skip! The seedlings need high humidity to germinate. You can also seal the pot in a plastic bag, or cover it with glass, and achieve the same outcome. I’ve had the best success with Saran wrap, but you may find it easier to use plastic sandwich bags! Experiment until you find what works.

My seedling super kabuto, and above, a kikko nudum
First Weeks with Seedlings
Once you see the first green seedlings sprout, it’s crucial to keep them in a very well lit area, but not in direct sun. If the light isn’t strong enough, they’ll stretch, and struggle to thrive.
I use seedling mats to keep my pots warm and start seeds around this time of year. This keeps the pots around 70 – 80F, which they need to germinate successfully. I keep them on the mats until the first tiny seedling leaves give way to the tiny cactus body, and then move them to a similarly well-lit spot. At this time, I also remove the Saran Wrap covering them. They need to stay moist and consistently watered, but I find leaving the covering on for too long leads to fungal issues.
This is the first step to “hardening off” the seedlings. When nights are above 50F consistently, I will move them out to my greenhouse, with 40% shade cloth. For example, seeds I start this weekend (02/26) I can expect to germinate within a week, be off the seedling mat in two weeks, and ready to move to the greenhouse by late March or early April.
Without a greenhouse, you can still follow a similar schedule for moving your seedlings to natural light exposure. When nights in your area are regularly above 50F, you can move them out to a sheltered spot that is shaded during the brightest part of the day and protected from rainfall.
As they get older and larger, they become more resilient. By 6 months, I generally treat my seedlings as I do the older plants, although I’m more generous with watering. After the first year, they are repotted in spring, and treated exactly as the older plants are.
Cultivars and Varieties
Thanks to the generosity of Alex Gonzalez, we can see a selection of the cultivars and varieties of Astrophytum asterias that are available to grow. His private collection is an amazing example of the range of the plants and is directly responsible for how dearly I seek some cultivars! You can see his collection and follow along with his growing at @cactusupdate.
From Alex: “Here in Tucson I grow them in 75/25 pumice/compost and water twice a week in the summer, lightly every other week in the winter. It seems like at least one dies every winter but that seems to be the way of the asterias with everyone I know who grows them. They really are delightful spheres that reward you with generous blooms from spring to fall!”

Alex’s asterias bench

A. asterias cv “hanazono” known for excessive areoles and blooms

A. asterias cv “ooibo” known for oversized areoles

A. asterias cv “kikko” (also variegated) known for segmented ribs