Monilaria after just waking up – mid October 2023
Bunny Ear Plants are in the genus Monilaria, which places them in the family Aizoaceae – they’re mesembs, like Lithops and Conophytum. This means their care is a little more finicky than a typical succulent, but I’ve found them to be easier than their rock-shaped cousins.
Crucially, though, to succeed at their care, you need to remember that they are mesembs: they have a summer dormancy where they should get little to no water. They may look a little on the dead side, but that’s normal: just put them under your bench and let them sleep away the hot months. They’ll re-emerge in fall, as the nights start to cool off.
They can live quite a long time, and with consistent care, they grow into small shrub-shaped plants that are a bit…shaggy looking. I was fortunate enough to see some older plants in Steve Hammer’s greenhouse, and they were admittedly a little funky looking.
How to Grow Monilaria
The Monilaria I have the most experience with is my own – the Monilaria pisiformis, one of the easiest to grow species in the genus. As far as I can tell from Google, I believe Monilaria moniliformis is similar in care needs, but haven’t grown my own for more than a year. I have grown some from seed, however, so I’ll share how I’ve done that for the other species later in this post.
Soil for Monilaria
As with most mesembs, they like a very well draining, highly inorganic mix. I have mine potted in a mix that’s about 50% pumice, 25% orchid bark, and 25% cactus and succulent soil. If you’re able to mix up a batch at a time, my super-scientific method for achieving this is counting scoops of soil: I’ll do 6 scoops of pumice, 3 scoops orchid bark, and 3 scoops of soil. If you’re using succulent soil similar to mine (an organic mix with pumice mixed in already), then like me, you’ll probably suspect there’s not enough organic matter in there. If I’m mixing up a larger batch, I’ll add a scoop or two of houseplant soil (Happy Frog, usually), along with an extra scoop of succulent soil.
It should closely resemble pumice with a sprinkle of bark mixed in, and a coating of soil around the pumice stones. If you’re only trying to make up enough for one pot, use your pot to measure out the quantities, and mix the soil in a red solo cup or some other smaller container.
The important part is plenty of inorganic matter for drainage, and to ensure the roots can rapidly dry out between waterings when they’re awake. You do need some organic material (soil) to help them grow, but they don’t need much. I mix orchid bark into my soil due to the heat in my greenhouse: the bark holds onto moisture longer than the pumice does, but dries faster than pure soil would.
If you’re trying to grow your Monilaria in a window, or are in a climate that’s more humid than a southern California summer, you probably don’t need the orchid bark at all, and can do 75% pumice to 25% soil. In higher humidity climates, or in the moderate conditions of growing indoors, this high ratio of inorganic matter keeps the roots dry enough for the plant to thrive.

Monilaria waking up at Steve Hammer’s greenhouse – enchanting as they are, they only look like this for a few days before their “bunny ears” grow considerably larger. Ther’s no way to keep them looking like this permanently! If that’s what you’re looking for, you’re chasing a dream that doesn’t exist.
Watering Monilaria
This is easier than you think: when they look wilty, drench the soil.
If they’re not wilty, don’t water them.
That’s it.
except…
Like all mesembs, they go through a period where they divide: you’ll see a split between the existing fleshy leaves, and new leaves will begin to emerge.

This is what a thirsty Monilaria looks like – although it’s at the edge, because it’s also beginning to divide.
From what I’ve seen of Monilaria, it appears the newly divided leaves grow, generate some growth, and the old leaves are absorbed and slowly whither away. The new leaves then shrink into themselves, develop a layer of paper-like covering, and sleep away the summer.
I describe this because it’s important to know as you decide whether or not to water your Monilaria.
Is it waking up, with the cute little emerging ears? Yes, give it water. Don’t water again until you’re sure the soil is dry.
Is it still growing its emerging leaves? Water it when they start to droop and look a little sad, or wrinkled.
Is it splitting? And new leaves are emerging in the middle?
You still want to water it – just not as much. For me, it was waiting an extra few days, or even a week, before I’d water again.
This is where Monilaria differ from Lithops or Conophytum.
While your Monilaria is actively growing, it’ll appreciate more water than the mesembs you’re more familiar with. That’s even true when it’s dividing – although as with other mesembs, it still shouldn’t get much water when it should be absorbing old leaves.
Instead of keeping it bone dry, instead, watch it. I’ve noticed even the new leaves will get a bit wilty when the plant is thirsty, even if it should be absorbing older leaves.
They also appreciate water even through their dormancy period, although even less than when they’re dividing. A little splash or a trickle once or twice a month, especially if its hot, is about all they need. This is a significant difference from Lithops and Conophytum, which need to be almost entirely dry all through summer.

My Monilaria pisiformis in December, 2023, showing active new leaf growth with some older leaves still around.
Light Exposure for Monilaria
These little bunny ear plants do well with nearly full sun. You’ll have to adjust where you keep yours to ensure adequate light exposure during winter, when it’s growing, which makes windowsill culture a challenge. If growing yours indoors, you may need to consider supplemental lighting.
For me, based in San Diego, I keep mine in my greenhouse. I keep it under my benches all summer, while the plant is dormant and the old leaves are sheltering the growth points. The shadier placement and being lower on the ground (on top of my cement floor) keeps it cooler and protects it. While they can survive high temperatures, it’s not their favorite, so I do what I can to keep it protected.
In fall, once I see the new growth points start to emerge, I move the plant back up to the benches where it has full sun. They grow rapidly, from the tiny little bunny ears that people love to huge floppy bugs-bunny ears in a matter of weeks. Once you see the green new leaves poking out, it’s time for more light exposure. In winter, this typically means nearly full sun (at least for me). You’ll want to adjust based on your own growing conditions: if you’ve got lots of cloud cover, gloomy days, and little sunshine, supplemental lighting is going to be a requirement for nice, compact growth.

The first signs of waking up for the year – late September 2023
Monilaria grow in seasonal cycles.
They’re less finicky than a lithops, and more forgiving with extra water and fussing. If anything, they may even like a little more water.
But they are very much a seasonal grower, looking nearly dead every summer and waking back up in fall. Don’t toss them out!
Understanding the seasonal cycles of growth is a critical part that is the biggest challenge for most growers. Water them, give them light, etc – but know that they do best with seasonal extremes of summer heat and cool, wetter winters. They like it! And they’ll reward you with regular growth.
But like lithops, they only grow one time a year – so your seasonal leaves are all you get.
They also won’t stay a consistent shape or appearance, or look exactly like the online photos year round. That’s normal, natural, and entirely expected! Perfect bunny ears that stay that way forever are a complete myth.
So you got some Monilaria seeds – now what?
I tried growing Monilaria from seed for the first time this year, and was delighted to learn that they are just as easy to germinate as Lithops and other mesembs. I suspect that for many, the struggle is the transition from germination to the first leaves, and then hardening off before the summer dormancy period.
Below, I’ll detail what I’ve done so far – I’ll admit, as of this post, I haven’t grown them through to summer dormancy, so I can’t speak authoritatively to what it takes to successfully get them to make it through summer that first year. However, I have grown Lithops and Conophytum through that first period (which is the hardest), and these seem to be very similar in that regard.
Germination
The first step with your Monilaria is to sow them, and get them to germinate.
I use essentially the same soil mix as what I described for growing the established plants described above, with one key difference: I’ll sprinkle a very thin layer (a centimeter or two) of succulent soil on top of the mix, which gives the seedlings something rich to root into and turn into rapidly getting established.
When setting up your seedling trays, boil some water first, and then pour it over the pot with the soil you’ll use for germination. You might want to use a chopstick or small trowel to stir the soil, or to ensure that there’s still a thin layer of soil at the top of the pot. You then…need to wait, and let the soil cool off after the boiling water was poured on it.

Monilaria clivorum seedlings in my greenhouse, 3 months old
Once the soil has cooled to at least room temperature, gently sprinkle your seeds over the soil as evenly as you can. The truly obsessive growers might consider using a tooth pick to position seeds, but I am not that precise, so I just sprinkle seeds over the soil and hope for the best.
After that, use your trowel or just fingers to gently sprinkle a very thin layer of play sand or silica over the seeds. This is a crucial step! The sand helps keep the seeds pressed to the soil, but because the sand is mostly transparent, it also allows enough light through for germination. I have far better germination and long term success rates using a thin layer of sand than without – so if you can use it, do so!
From there, you’ll need to create a humidity chamber.
Personally, I’ve never had success using a plastic baggy to do this – but some folks do! The plastic baggy method is just after your dusting of sand, you stick your entire pot into a plastic bag, seal it, and that’s it. That’s your humidity chamber.
What I’ll do is a variation: I use cling film, cutting out a sheet just a bit bigger than the pot, and taping it tightly over the top. This creates high humidity at the top of the pot – but leaves the bottom of the pot free to drain. I’ll set the pot in a container with a thin layer of water, allowing for the moisture to wick up and keep the whole pot damp. This moisture is needed to get the seeds to germinate!
Check your seeds daily, especially after two or three days. Mine all germinated within a week, and that’s when you move to the next step.

Hardening off your seedlings
Once I see the first seedlings emerge, I’ll monitor for another day or so. After the first day, I then remove the cling film covering so the seedlings have exposure to air. It’s critically important at this stage to keep the tray that the pots are in consistently full of water, which keeps the soil moist. As the seedlings are extremely delicate, it’s not good to water from the top, so the moisture from below helps encourage roots to grow down and stabilize the young plants.
This is also one of the first really sensitive points for your seedlings. They need fairly consistent moisture, and also just the right amount of light. You don’t want your seedlings to stretch or get too weak at their base before they’ve made their first set of ‘true’ leaves.
Here, I’ll describe what I do, and you can read it and decide what makes sense in your situation. Your growing conditions are not mine! What works for me might not be feasible for you – but hopefully, it’ll give you an idea of what to do.
Within a week of seeing the leaves emerge, I’ll move my seedlings out to my greenhouse in a shaded spot. I only sow seeds when nights are above 50F, so I’ll start a tray or two every weekend through September, October, occasionally through November. This lets me move seedlings into the greenhouse while nights are still moderate, and lets seedlings get accustomed to the weather in a sheltered way before the coldest time of year for my area rolls in. The other part is starting seeds in fall, when days aren’t too hot (not above 90F) and entering the beginning of the growing season for the species. For Monilaria, the start of their growing season is fall, so you’ll set yourself up for success by sowing seeds at that time of year.
Once seedlings are in the greenhouse, especially with warmer fall days, I check them at least once a day and mist the trays. I mist them with a dilute fertilizer in the water – a 1:1:1 fertilizer at 1/4 strength. I don’t see the same level of success with my seedlings without the fertilizer mist, especially when they’re young. I’ll mist them daily the first few weeks, and then as the plants split and produce their first true leaves, they can be weaned back to less frequent water.
First True Leaves
I keep mentioning the first true leaves – what’s that mean?
The seedlings for mesembs produce strange, fleshy little first leaves that emerge and look like little alien miniatures of the adult plants. Those first seedling leaves are not the true leaves, and are the powerbanks that will produce the first leaves.
These first little baby leaves from the seeds will split within a month or two, and will produce the first true leaves. “True Leaves” are the leaves that are what adult or mature plants produce. In Lithops, they will be the first leaves that look like tiny versions of the adult plant. In Monilaria, it’ll be the first bunny-ear looking set of leaves.
I’ll fertilize my seedlings up until I see the first “true leaves” start to emerge. Unlike established plants, you shouldn’t dry out your mesemb seedlings while they’re absorbing their germination leaves to produce their true leaves. This is one period of time where you should “spoil” them and let them have the extra water, give them the dilute fertilizer, let them take their sweet time to absorb those older leaves.
In my Lithops seedlings, this initial bit of giving them everything they need led to the first true leaves being relatively large and established enough to really hold out through summer dormancy.
I plan for my Monilaria seedlings to continue to get water through summer, just not as much, and they are already splitting and producing their first true leaves (as pictured above).

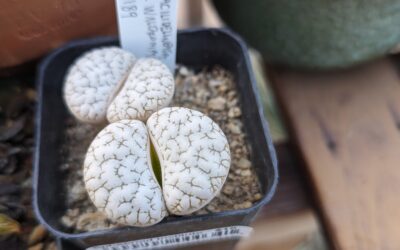
Monilaria take years to reach appreciable size, which you can tell by looking at their stems – the one above is at least a few years old, shown by the rings of older growth at the stem.
I’ll post an update next fall with the progress of my seedlings – I have 4 different species, 10 to 20 seeds of each, and have seen about 75% germination rate from the seeds I’ve sown. I do see active growth, emerging true leaves, and I’m optimistic for how summer will progress. I may bring the Monilaria seedlings indoors for summer; my greenhouse reaches 125F regularly through summer, and I’m not sure such high temperatures will be tolerated by seedlings.
Have you grown Monilaria from seed successfully? Share it with me on Instagram! @TrexPlants – let’s combine our experiences and help other growers succeed.

Wrapping with a gratuitous puppy photo: Luke giving his best smile 😀
Thank you for reading!