Anthurium Care is Definitely a Learning Curve
Alternatively, “How I have almost killed my clarinervium, but it survived anyway”
I love velvet-leaf Anthuriums. I love the velvety dark leaves, the striking contrast of the veins, the texture of the leaves, all of it. I don’t think there’s such a thing as too many Anthuriums.

I am Marge.
*not an Anthurium clarinervium pictured
I have ogled these gorgeous plants online for years, and finally pulled the trigger on getting my first one in early 2019. My first Anthurium was a young clarinervium, purchased from a very kind lady on Instagram (@f0reveraplantlady if you’d like to check out her drool worthy collection) for a price that was very high to me at the time; they’ve more than quadrupled in price since then, so it was definitely a score! The risk I took at the time was substantial, considering I’d barely dipped my toes into houseplants. Now in 2020, I’m going through my second winter with my original two anthuriums, and my first winter with the other newbies to my collection. I’m more confident now, but man, it was a journey to get here. I didn’t know it at the time, but the two anthuriums I started with were probably the absolute best of the genus I could have chosen to learn with.
Dear Anthurium clarinervium, I am so sorry.

The first new leaf after it arrived! This young plant was so full of hope and promise. Little did it know what it was going to endure.
Almost immediately after getting this adorable little plant, I began going through every single thing you’re not supposed to do because I was a complete novice. Here is a by no means complete list of all the ways I have abused this clarinervium:
– Repotted way too often, in different soil each time
– Left it outside during a heat wave, burning most of the leaves
– Left it outside during cold spells, causing leaf drop
– Forgetting to water it to the point of seeing leaves droop
– Over fertilizing with fish emulsion, to the point of seeing mold on the top of the soil
– Under fertilizing, causing leaf drop
– Not enough light, so no growth
– Too much light, burning leaves
– Not enough humidity like, ever
– Infested with, and succesfully combated, spidermites
– Myself breaking leaves
It’s been just shy of 2 years that I’ve had this plant and I have managed to screw up nearly everything you can possibly screw up.
Not only has the plant survived, this thing is fuckin’ THRIVING. 10/10 would recommend clarinerviums to beginners. A+ plant. It bloomed profusely for me this season, keeps throwing gorgeous new leaves, and I think I finally figured out the fertilizer regime to a cadence that is letting it keep more than one or two leaves at a time. Bye bye, one leaf club.
I don’t have a ton of photos of the abuse this poor thing has gone through (who takes pictures plant abuse on purpose?), but I’ll breeze through notable moments before jumping to the care routine that has actually been successful.
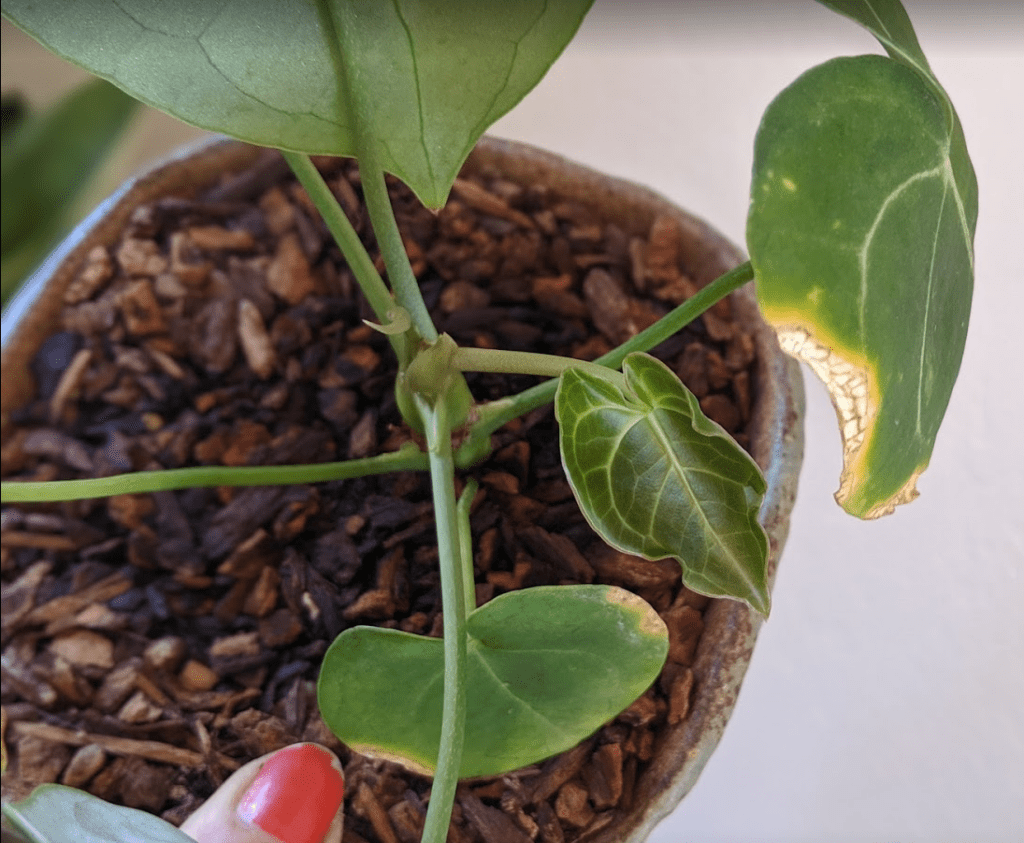
When I first tried putting it outside during some June gloom type weather. “My Monstera deliciosa loves it here,” I thought to myself. “The Anthurium will surely love it too!”
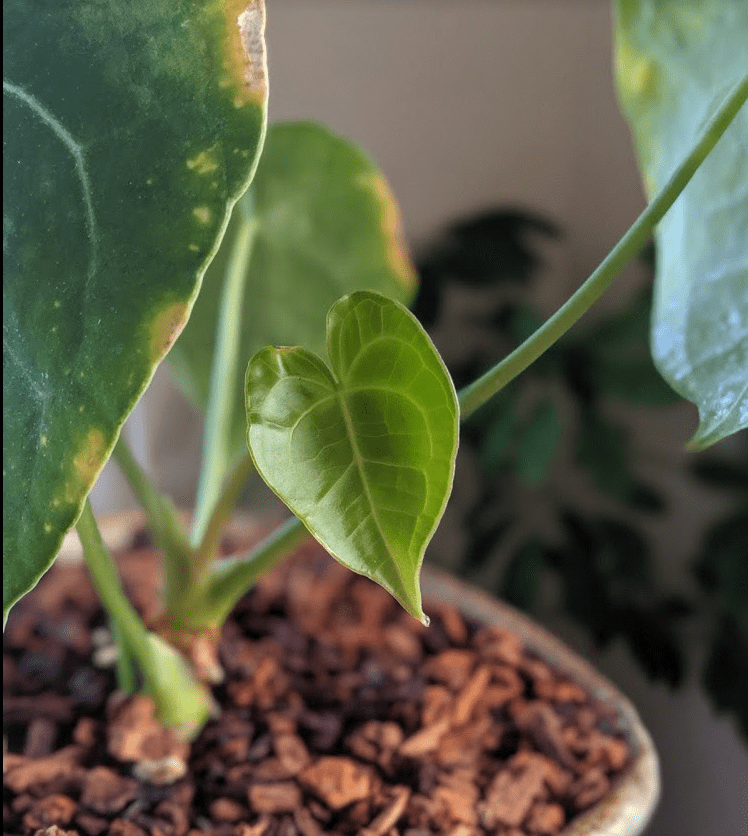
No. This was wrong. It promptly began killing off its baby leaves. You can see several around that one leaf turning yellow around the edges already; this was likely due to low humidity combined with inappropriate soil. I had it in Miracle grow, I think, or something similar. I might have mixed some orchid bark in there? It didn’t like it, but took it’s time telling me, because Anthurium clarinerviums are polite and try to grow before barfing all over your care ideas.
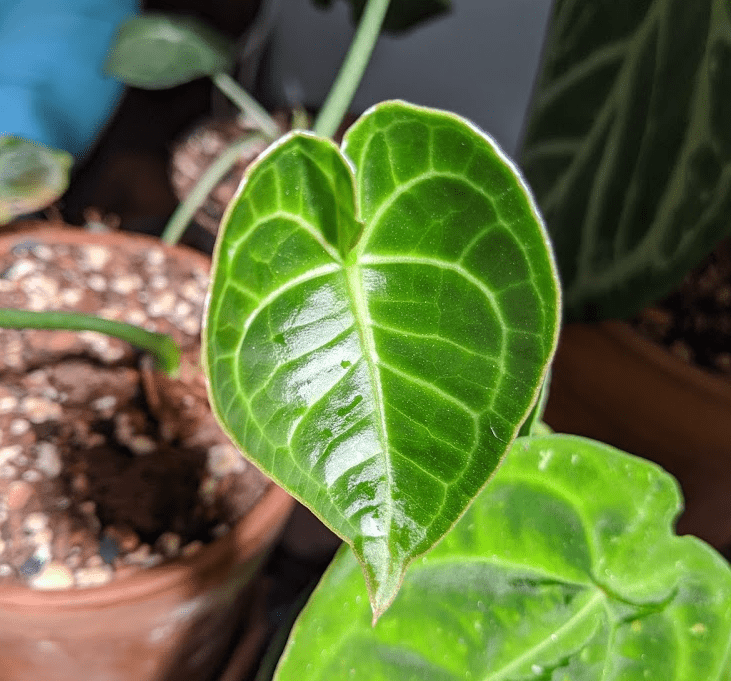
Oh look, it’s two months later, and it’s already in a new pot, now with orchid bark around it! Good. Good. That new leaf is barely a couple days old and ALREADY has damage and crisping edges. Clearly, I am doing great. It’s back inside, and I think it’d only dropped a couple of the juvenile leaves it had arrived with at this point. Despite the funky look, this leaf did end up growing into something almost characteristic of the species, right up until I think the bottom half burnt to a crisp because I left it outside on a day I thought would be cool enough.
Oh look! It’s another couple months later, now into early fall, and there’s another new leaf! Also note the photos are suspiciously only showing new baby leaves? Hmmmmm.
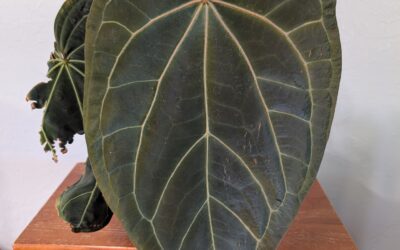
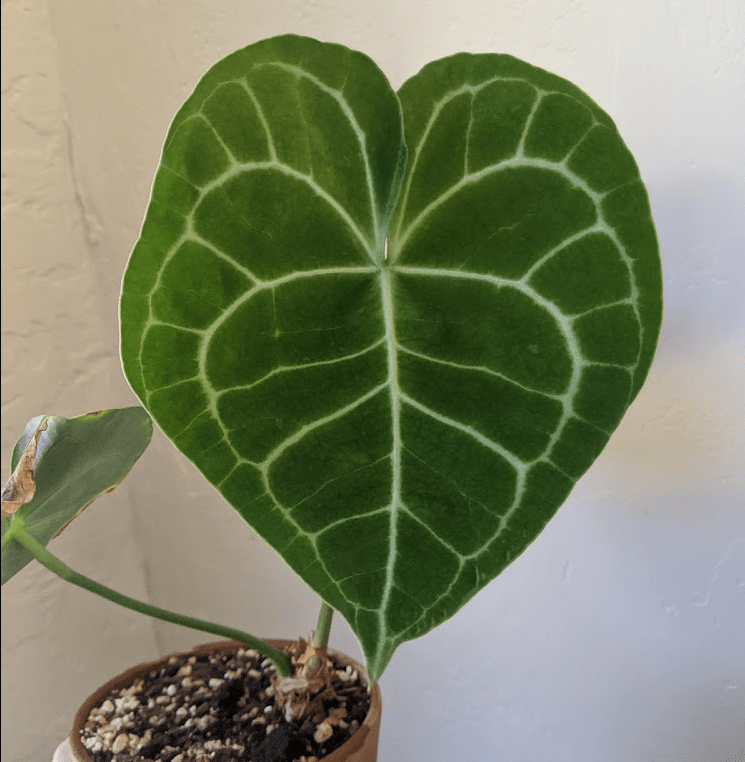
The photo above is of a new leaf (again), but it’s about 9 MONTHS after the previous photo. Poor little Anthurium clarinervium was just moving along on the struggle bus, but it never gave up, and by the time I took the photo above (July 2020), it was finally rebounding from the sheer quantity of my incompetent care. Notice the Anthurium forgettii below; I had figured out where I was messing up and was scooping up other species as I found them for reasonable prices by this time.
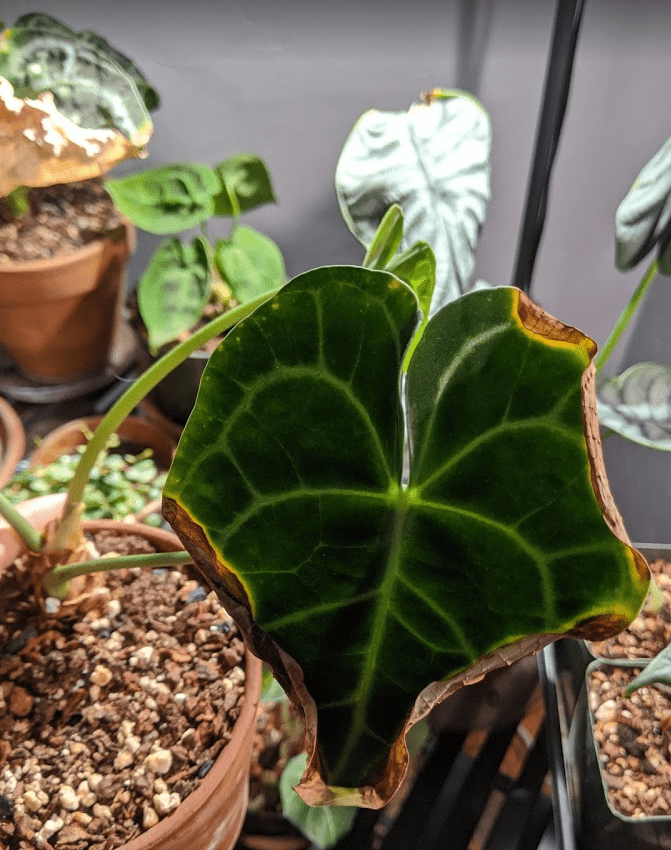
Ah, yes. There it is. There’s the reason for the shame. If you look at the upper right corner, you’ll see my Anthurium hybrid also looking very, very sad. This is why you don’t leave Anthuriums outdoors in San Diego in July. You’d think I’d have learned from the year before this, but clearly, I am slow on the pickup. Also, though, note the pot and top dressing of soil – earlier in spring I’d researched and learned enough about soil and exotic tropical plants to try my hand at my own soil blend, and it worked like gangbusters.
Above you see a few weeks later, when I’d cut off the crispy leaves in despair (don’t do that, they need the nutrients from dying leaves), and it started putting out nice shiny new leaves. At this point, it promptly got spidermites, and I won’t keep posting pictures of what is essentially a photo diary of me increasingly getting irritated with nature.
Care routine for Anthurium clarinervium
I have come to the conclusion that Anthuriums are basically orchids, but easier. I’ve had Phalaenopsis orchids for years, and have them repeatedly bloom for me, and while my orchids may not be nursery-level gorgeous, they’re doing just fine.
This means I treat my Anthuriums a lot like orchids: airy, porous soil with large chunks, thorough watering, letting them dry before watering again, and plenty of bright, indirect light.
Starting with Soil
I mixed up my own aroid soil blend in spring this year, and used it for everything. It’s equal parts peat moss, small orchid bark chips, perlite, and the remaining quarter is a blend of worm castings, bone meal, and horticultural charcoal. I also added a bit of mycorrhizae to encourage healthy root growth.
Peat moss: This is to hold in moisture, pretty much. It’s the decomposing planty corpses of a variety of peat mosses, harvested from peat bogs as an acidic growing medium. It tends to cling to things like fertilizers and nutrients and water, making these things available to your plants’ roots for longer periods of time. Because it clings to water like a bad ex girlfriend clings to the past, it also means it stays wet for an overly long period of time. The way peat moss tends to hold on to moisture is why it needs to be mixed with other soil mediums for those of us at home. In a nursery setting, plants are watered thoroughly, to the point of water draining out, every time they’re watered, so being in a nearly pure peat moss mixture isn’t as big a deal. Without the thorough flushing, or being combined with other medium to aerate it, peat moss has a tendency to get stagnant and quite nasty.
Orchid bark: These are bark chips made from fir bark. Fir bark resists decay and compaction, so the soil stays nice and airy longer. Sometimes, pine bark is used, but generally all I have available is fir bark so that’s what I use. It absorbs moisture readily enough, but also releases it fairly consistently, which is why it’s so useful for orchids. The moist bark releases the water it’s absorbed over time, increasing humidity in the tiny area around the plant, and ensuring water is available to the roots. The chunkiness of the bark also means that there’s plenty of space for roots to go, and if you’ve ever seen how chonky Anthurium roots are, you’ll want that space available for them.
Perlite: This is technically a type of volcanic rock that has been popped like popcorn from high heat. As far as you and I are concerned, it’s tiny white granules of inorganic material that are suspiciously lightweight. They are yet another type of medium that promotes aeration in the soil, as well as water absorption and release. Perlite releases water at a different rate than orchid bark or peat moss, so it offers a varied water absorption option for your plants. It’s a different granule size than the bark or moss, so it also keeps the soil from becoming too uniform or compacted (dense). I like to add this to soil blends to ensure that the mixture doesn’t stay too wet for too long, as it tends to evaporate quite quickly compared to other mediums.
Worm Castings: Worm poop! A nice, mild fertilizer full of nutrients. These are slightly basic, with a pH of 7-8, and last for quite a while as a soil amendment, with the vitamins and minerals being released over a time period of 1 -2 months. These tend to be higher in nitrogen, and have a ton of other micronutrients. I will add more worm castings to the top of my soil and gently work it in to the top layer about once a season (so once in spring, once in summer, etc).
Bone Meal: This is kinda gross, but it’s ground up animals bones and slaughter house waste products. Bone meal is high in phosphorous, and encourages strong root growth (great for our thick-rooted buds, Anthuriums!). In food and flower gardens, bone meal is an essential amendment to encourage flowering and fruit production. For my aroids, I use it as a root growth encouragement and to help round out the soil supplements I provide. It’s a relatively slow release fertilizer, with a typical application lasting about 4 months. For my alocasias and anthuriums, I use bone meal as part of their spring soil refresh/top layer amendment (if I’m not repotting).
Horticultural charcoal: This is used to help mitigate issues with over-watering (something I can be prone to do), as well as ensure water sitting in the soil doesn’t become stagnant. Horticultural charcoal is essentially activated charcoal, which I’ve used for years in vivariums and aquariums for water filtration and overall water quality. It also absorbs toxins or fungus, so if you’re using tap water, softened water, or just generally worried about water quality, this is a massive help. I don’t use a ton; it’s a supplement more than a main component. I’ve noticed an overall improvement in plant health since adding charcoal as a part of my blend, and plan to continue.
Mycorrhizae: Beneficial fungus! Since I’ve made a blend from scratch with primarily sterile ingredients, I wanted to be sure to add some beneficial fungi back in. Healthy soil is alive, and needs fungus and other microorganisms to be healthy and break down decomposing matter, excess fertilizer, and plant byproducts. Adding these guys in helps kickstart soil, and you really don’t need much.
Watering
Honestly, these are surprisingly forgiving plants. I messed up a lot at first – overwatering, underwatering, the gamut. I try to avoid letting my Anthuriums dry out to the point of leaf droop, as they don’t really like getting quite that dry, but I do wait until I can tell that the top layer of soil is quite parched. I don’t like to stick a finger or moisture probe into the soil, as these have quite thick roots, and the probe can damage them. Instead, I am a huge fan of terra cotta pots, where you can see the moisture on the outside pretty readily. I also lift up the bottom and check to see if the bottom is dry or still damp.
I try to thoroughly flush my Anthuriums at least once a month. This means I drag them into the shower, and carefully hold them under the spray to clean and spray the leaves, as well as water the soil until there is a consistent stream of water from the drainage hole at the bottom of the pot. I’ll usually do this at least 2 or 3 times, rotating between plants so the soil has time to drain before I soak it again. The humidity of being in the shower, the thorough soaking, and the thorough rinse of water all the way out helps keep the soil from building up minerals such as salt or calcium. At our house, we have highly filtered, slightly soft water, so a build up of salts is a concern for me. The high filtration of our water (down to microns; the water out of the shower or tap in our house is similar in quality to bottled alkaline watter) means that I am not terribly concered about chlorine or other chemicals, and I rarely, if ever, see leaf burn as a result. Our local water is highly alkaline – out of the tap, it typically reads around pH 8, sometimes as high as 8.5, so compared to what Anthuriums generally prefer...we are way too alkaline.
I haven’t personally seen a dramatic impact on my Anthuriums due to alkalinity aside from initial acclimation stress, and my clarinervium in particular has been going strong for nearly 2 years with no particular care given to making the water acidic. Based on research we’ve done for our miniature aquarium as well as my other acidic-loving plants, it’s better to acclimate things to the more alkaline water than it is to try and bring your water pH down on a consistent basis. Soil additives can help, and you should be cautious against fertilizers or additives that bring up pH, but in general, this is a low concern once your plants have recovered from the stress of adapting to a new place.
Aside from the once a month soaking, I also water using a watering can or my trusty condiment spritz bottle. If the plants look particularly dry, I’ll add water until I see some start to come out from the bottom of the pot (coincidentally, this is one reason I suggest to never pot your anthuriums in something without a drainage hole). This typically doesn’t saturate the full soil medium, but it’s enough that they aren’t going to die of lack of moisture. I use my plastic condiment spritz bottle to provide orchid fertilizer – addressed in the next section.
Sadly, there is no consistent routine for how often I water in this way. In recent months, thanks to COVID-19 forcing me to be home constantly, I’ve come to realize it’s roughly once a week when ambient humidity is between 40 and 60%. When it’s dry (as it has been lately this December; average humidity in the house has been between 10 and 20%), I need to add water every couple of days.
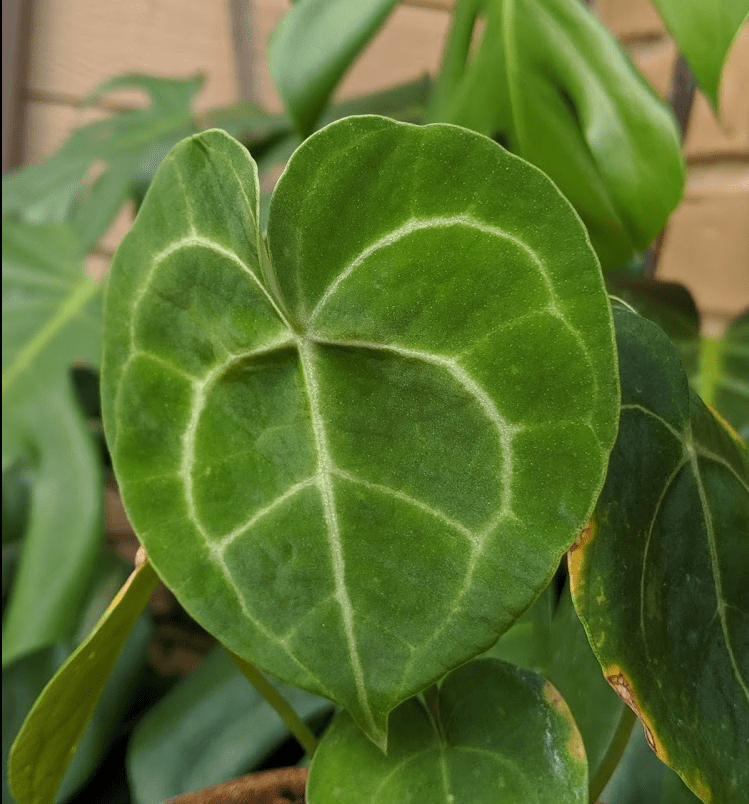
Check that itty bitty bloom coming out at the bottom! I tied up the leaf so it’d sit up higher, but that was unnecessary – when happy, these guys kinda lean.
Fertilizing Anthurium clarinervium
I alternate between a dilute blend of fish emulsion and powdered orchid fertilizer. I recently added Super Thrive to my regime, and I’m hopeful it’ll have some noticeable effects, but it’s only been a couple weeks at this point so it’s too early to tell.
I like to use dilute (half to one teaspoon for 1/2 gallon water) fish emulsion every other week or so during the growing season. It’s higher in Nitrogen than other nutrients, which helps support robust growth. Nitrogen is a key part of the chlorophyll molecule, as well as the plant’s basic cell matter, which is why a higher ratio of nitrogen is essential when plants are producing new leaves. When it comes to fertilizing your Anthurium clarinervium, you’ll want to ensure it has plenty of nitrogen available to absorb.
Fish emulsion is a regular part of my fertilization routine, despite the smell, because it also contains a ton of micronutrients. Since making my own mostly sterile blend, even with my beneficial fungi buddies the mycorrhizae, I want to be sure I add in the wide range of nutrients that my Anthuriums will need for healthy long term growth. I’ve seen photos of people who have had their Anthuriums for years, sometimes decades, and I am sure a part of this longevity comes from variations in soil composition and micronutrients in their routine.
I also use a very dilute mix of orchid fertilizer – the powdered blue stuff you can get on Amazon or at your local garden center. I mix in maybe 1/4 to 1/2 teaspoon to every 500 mL (I switch measurements to mL here as that’s what on my handy dandy condiment squeeze bottle), and as with the fish emulsion, water until I see it just starting to come out of the bottom. If I’m fertilizing after a shower soaking, I’ll also water the leaves with this dilute mix, but that’s only about every 2 or 3 months that I remember.
The orchid fertilizer is a stronger, balanced fertilizer that has an even blend of Nitrogen, Phosphorus, and Potassium, but in a ratio that’s quite high compared to other fertilizers – 20:20:20. By diluting it, I’m ensuring I don’t burn my Anthuriums, who don’t need a ton of extra food. They just need their nutrients available when they need them. I’ll use the orchid fertilizer on alternate weeks that I use the fish emulsion, if not slightly more often. My cadence is roughly 2:3 of fish emulsion feeding and orchid food.
My frequency is roughly every 10 days; if I’m watering twice a week, then on the second watering, I’ll add food. If it’s once a week, then I feed every other week.
You do need to feed your Anthuriums if you want robust, consistent growth and those giant leaves that are so striking. Whether you follow a routine like mine, or come up with your own, is up to you and your diligence! For the first year I had my Anthuriums, I barely fertilized them at all. They were also not in my personal blend of soil, so the miracle grow or whatever I had them in had fertilizer of its own.
Lighting for your Anthurium clarinervium
A crucial part of growing this plant is lighting. They need full spectrum, bright, indirect light – which is a pretty lousy way to describe lighting for most humans. If you really want to grow these successfully, you can either download a light meter app on your phone, or purchase a light meter to use.
You need a light meter to measure the brightness of where you’ll be keeping your Anthuriums, and you also need to have an awareness of how bright the area is throughout the day. The way our eyes perceive light, we rarely consider that the brightness changes in a dramatic way during the day, particularly based on how close to the window you are, where the sun is, and how opaque your blinds are. We generally perceive light in ranges of “bright enough to see”, not so much the “bright enough to grow” ranges that plants need.
When I was keeping my anthuriums by a window, they did best with a range of 300 – 500 foot candles through the day. I had them positioned in an area that got a lot of very bright, indirect light, but never really saw the sun through the window. This meant that even right up against the window, the light didn’t get any brighter than 500 – 600 foot candles even on a bright summer day. My light meter measures in Lux, and the range was 1500 lux in the early morning up to 5400 lux at the brightest point of the day. By about 9 or 10 am, the lux climbs to about 4100, and from there climbs to the high point and back down over a span of about 6 hours.
If your plants are in an area that spikes with midday or early afternoon brightness that’s in the 1000+ foot candle range, but only for an hour or two, that can mitigate the rest of their time spent at less than 100 foot candles. It also means if you’re growing your plants in a grow case (as I am, now), you’ll have to pay attention to the lights you use. I went with LEDs in my grow case, and had to pay extra to ensure I got strip LEDs that would be bright enough. In the case, with no/minimal daytime brightness fluctuations, they get a constant 250 – 300 foot candles a day depending on how close their leaves are to the lights. The consistency of the light makes up for the plants not getting the brighter spikes they did by the window.
The consistent light is doing the trick so far; the newest leaf is nice and big, and it’s even blooming again. I can’t wait for it to put out a new leaf that’s entirely within the grow case to see how the higher humidity, consistent temperature range, and consistent lighting impacts leaf growth.
Final thoughts – including crispy leaf edges and imperfect leaves
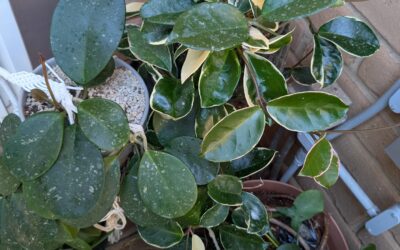
I see a lot of folks in plant groups posting frantically about the edges of their leaves turning crispy or brown, in a panic that the plant is dying or sick or they’ve messed up the care in some dramatic way. The majority of the time, the plants simply have some damage or dryness on the leaf edges – and it’s totally normal! One of my favorite experienced tropical plant growers on Instagram, @thejunglebums, posted her collection a while back and nearly every single plant had crispy or imperfect leaves. Her plants were all healthy, established, and producing flowers and seed, so obviously they were thriving. It’s just a natural effect that unless you’re growing in pristine nursery conditions, you’re going to end up with imperfect leaves.
It’s okay and it’s normal. Enjoy the new leaves that come out shiny and new and perfect, and embrace that as they mature and get older, they’ll get a bit beat up and rough around the edges.
Glass case / grow case for anthuriums?
I will admit that I finally got my hands on an Ikea glass cabinet for my anthuriums and other high-humidity loving plants, and it’s made it much easier for pretty leaves to come out. While I did fine with humidity ranging from 50 – 60%, whenever we’d get Santa Ana winds, a dry spell, or the AC or heat would run on a daily basis, the anthuriums were not big fans. I tried using humidifiers next to my plants, which worked, but we were so consistently at the low end of the humidity spectrum that the humidifiers had to run constantly, leading to condensation on any nearby surfaces.
The glass case has been in use for a couple months now, and there’s been some learning to do. I have small computer fans on each level to encourage air flow, and as I mentioned earlier, made sure to get LEDs that were bright enough per foot. With our dry winter conditions, I’m having to mist the case each morning to spike the humidity up to 70 or 80%. The case is not air tight, just protected, so the fans move air through the gaps in the front doors and the humidity declines over the course of the day. Below is a graph of my average temperature and humidity ranges in my grow case for an average week:

You can see which days I was misting the case, and which days I wasn’t – I didn’t over the weekend in this example because I’d just carted them all into the shower for a thorough dousing on Saturday (you can see when I had the case doors open and the humidity dropped to 55%!).
I’ll do a full guide on how we built and set up my grow case soon; our particular method was not necessarily the easiest, but it was effective. I’ll say for sure that if you’re going to use a grow case, be sure to build in some way for there to be air flow or ventilation. Without it, you’ll end up with stagnant, moist air, and your plants will be prone to fungal issues.
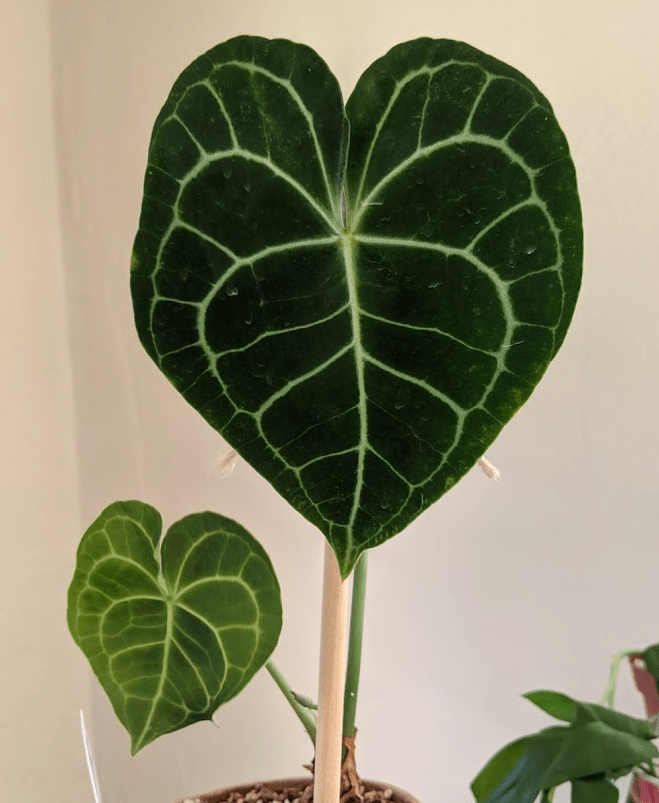
I hope this detailed description of how I’ve been caring for my Anthurium clarinervium is helpful for you! I’ll leave you with a photo of how it looks today, with its three leaves and tiny new bloom emerging.