These beautiful, velvety-leaved plants are breathtaking when full sized. The photos online have captured the desire and imagination of nearly any houseplant enthusiast who’s seen them, and I’m no exception.
I’d always thought they would be too hard to care for, or too needy, but after I had such success with my little Anthurium pendens and saw a plant friend selling one for a phenomenal price…I decided to give it a shot. I have an Ikea glass cabinet set up as a grow case, and figured I could baby it there.
To my delight, it was easier to grow and care for than I’d thought! I’ll preface all my description of care requirements and set up with the note that my plant came from a small propagated segment very close to seedling size. I can’t speak to how care changes for larger plants, but my smaller plant does well.
I’ve updated this post as of April, 2024, to include affiliate links and the result of my potting experiment. Affiliate links help pay for my server costs! If this post is helpful for you, please consider using my links to shop.

Care at a Glance
Temperature: 75 – 85F is ideal
Light: Very bright indirect; hang in a window or provide a dedicated grow light
Watering needs: Needs regular water, should dry almost entirely before being watered again
Humidity: 50% – 80% is ideal; the higher end preferably
Soil: Use a well-draining mix; 50% pumice and/or orchid bark at least, with a high quality houseplant soil as the rest.
Fertilizer: Offer regularly during the growing season; balanced or higher in Nitrogen
Potting your Anthurium warocqueanum
As my confidence with my plant has grown, I’ve adjusted my growing methods to find what works best in my growing conditions and with my habits.
Originally, I had my Queen in a hanging basket, using sphagnum to keep the soil and orchid bark contained in the large grid. This worked reasonably well, especially when we had to travel for work trips and friends had to watch the house for us. In a basket-style pot, hanging in the window, the care directions are easy: water it whenever you touch the moss on top and it feels dry. For my black-thumb house-sitting friend, I told her if she was worried, to just water it every day.
In the basket-style pot, that level of watering is acceptable: the excess water drains right out, and the roots have easy access to the air. In habitat, they grow as epiphytic plants, meaning they grow attached to other plants or surfaces with their roots exposed to air. They tend to get their water and nutrients from the air, rain, or debris surrounding them, rather than growing roots down into the soil. This adaptation is why they tolerate, and even thrive, getting dry before being thoroughly watered again.
Hanging basket style pots work very well if you’re worried about over-watering, or want to easily carry the plant into the shower for a nice steam treatment in the morning. I kept my Warocq in the basket style pot for over a year, and it thrived! I did however discover challenges in keeping it watered enough, especially as it developed a larger root system and needed to be watered more frequently.
I repotted the Queen into a terra-cotta pot late last fall (2022). I replaced sphagnum moss with orchid bark and pumice, with Happy Frog soil as my organic matter in the mix. There’s some sphagnum on top to help keep it from evaporating too quickly, but the goal with the terra cotta was to allow the soil to rapidly evaporate through the porous material. The terra cotta does allow for rapid drying, but not nearly as fast as the open basket did. I’ve found my Anthuriums in general to like terra cotta quite a bit, and to grab onto it with their roots.
April 2024 update: the terra cotta pot experiment failed. This plant died from not enough moisture, slowly over about a year. I have a new warocqueanum and have it in a regular plastic pot, and it’s been great.
No terra cotta for me for these guys!

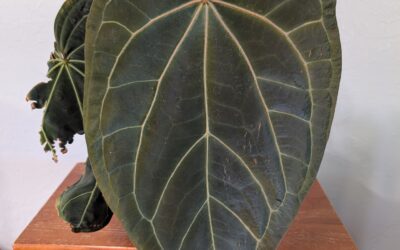
Late last year, the drying out and then getting watered again regime resulted in the apical growth point of the queen to die back (seen center, above). As that growth point crisped and died back, it extended itself to the side, and so my new growth is from a different point on the plant. My newest leaves have been smaller than the ones from the main stem, but I am happy to still have my queen.
The moss and bark seen above are quite dry, as this is a picture I took this morning prior to watering and feeding the plant. You can see roots crawling all over, peeking up just barely at the bottom near my thumb. That’s an excellent sign of a nice, airy mix.
To wrap up:
Aeration is crucial, and adjust your choice of pot and potting medium to your growing conditions. I prefer a 50% chunky/inorganic addition to 50% rich potting soil, personally, and use pumice and orchid bark to achieve the chunkiness that works for me.
While some folks grow the Queen just fine in pure sphagnum or ‘pon’ or hydroton, I’d caution against sterile potting mediums. There’s no room for error if you miss fertilizing on schedule, no option for a healthy root ecosystem with beneficial fungi (mycorrhiza), or availability of micronutrients from a compost-rich soil. If you have a lot of success growing this way – more power to you! I need my plants to have some resiliency built in with their soil and pot to thrive with my occasionally haphazard care.
April 2024 update: I belive the terra cotta dried out too quickly for my watering habits, and I simply couldn’t keep up with the water needs for the Anthurium. It did quite well for a while, when I wasn’t traveling for work or otherwise distracted. In late spring 2023, it began to decline, right around as I started a new job and it never recovered from the neglect.
Water and Fertilizer
To get the biggest leaves, most consistent growth, and a healthy, happy plant, you’ll need to feed your Warocq regularly during the warmer months of the year.
I do find that my Anthuriums slow down noticeably through winter, when our house temperatures are 65 at night and rarely above 70 during the day. During this period, when the plants are cooler than they’d like and not producing new growth, I don’t fertilize at all.
Water is a necessity, however, although unless you’re growing in a fairly sterile medium (pure sphag or pon), you don’t need to follow a super strict schedule. I water mine similarly to my cacti, to be honest, although much more often.

When the soil of your Anthurium’s pot feels dry to the touch, or only slightly damp, it’s time to water again. Water thoroughly, making sure the entire pot is drenched and water is coming out of the bottom.
I try to remember to adjust the pH of my water to be slightly acidic, around 6.5 pH, as we have very alkaline tap water that comes out at 8.2 or 8.4. The slightly acidic water helps the plant absorb nutrients better, and overall leads to better plant health. I use about a tablespoon of white vinegar for every 2 gallons of tap water, but make sure to test your water before following that recipe! A simple pH meter will do the trick, and doesn’t have to be overly expensive to work for you. A pH between 6 and 7 works well.
Check your pH after adding fertilizer before you add the vinegar. I discovered that my fertilizers actually decrease the pH of my water slightly, and I need far less vinegar if I’ve mixed in fertilizer than I do without it.
When I bring my plants into the shower for a thorough flush, I don’t worry about the pH in that moment. It’s more important to let the water flow through the soil and really drain out, bringing excess salts and deposits with it. If I have the time, I’ll flush the plants, then water them with my prepared acidic water afterwards.
The acid water / lowered pH stuff, while helpful, is also not absolutely crucial. If you’re using bottled water, it’s probably close enough to neutral to make no difference.
Do not use distilled water to regularly water your Anthurium! Distilled water has no minerals or nutrients in it, and the water molecules will bond to minerals and elements in your soil, actually leeching nutrients out rather than helping the plant absorb them. If you have particularly hard water and notice calcium deposits on your pots after a few months, a flush with distilled water can be helpful in that case, but it should never be the only source of water you use for your plants.

Temperature and Humidity
I was initially hesitant to bring one of these home due to what I’d read about their high humidity requirements – using air conditioning or heating, we end up far too dry far too often for this to be a houseplant.
With the addition of my Ikea cabinet, I thought it’d be fine and I could give it a try.
Ironically, it was rarely in the cabinet at first. The airflow outside and ability to hang from the grow light turned out to be more helpful as the leaves gained size. As time went on and I became more confident with the plant, I realized that what mattered most was honestly keeping it well-watered and fertilized, and the leaves would respond beautifully. Compared to my Ace of Spades or Anthurium regale, the warocq is actually easier in this regard.
That being said, being too dry and too hot for too long will crisp and kill. My plant’s apical growth point died back, and an offshoot emerged, but the leaves have not been as impressive as the ones from the older growth point.
Keep your Anthurium warocqueanum away from overly drying drafts, such as air vents or windows in dry climates, and you don’t need to be overly worried about humidity. I do still strongly recommend a shower trip every week or two if it’s manageable for you, though.
Temperature is a big deal
These are tropical plants, and more than anything, I found that low nighttime temperatures in winter would completely halt growth. My veitchii started growing new leaves again in late March, but my queen hasn’t produced a new leaf since last fall. My house’s nighttime temperatures in the coldest part of winter is 65, which includes the grow cabinet, and only recently have nights been 68 – 70. The veitchii seems happy enough with this, but the queen seems to have only produced some new root growth and little with her foliage. The oldest leaf is crisping/dying back (as of April 24), and I’m hoping the recent warmer weather is enough to wake her up.
In your home, consider your seasons and when your home typically ranges to the cool side. We only air condition our house to 80F, sometimes 78 if we’re doing a lot of activity indoors, and that’s when my warocq is happiest. If you keep your air conditioning set colder, or have longer winters than our 2 to 4 months of clouds, you may need to consider ways to keep the queen in a warmer bubble.
Seedling mats may work, or a dedicated grow cabinet such as the Ikea glass cabinets that became wildly popular early in the pandemic. When you add the necessary grow lights to your cabinet, they’ll naturally bump the temperature up a few degrees. In summer, I find my grow cabinet is often 84 to 86 degrees when my office is at 80, although as soon as the lights are off, the temperature drops to the ambient room temperature.

Light
These like it bright, although not full-sun bright. I’d argue that they make amazing hanging window plants, except for the previously mentioned sensitivity to temperature: chances are that the proximity to a window will lead to too much fluctuation in temperature to the low end for the Anthurium to be happy.
Due to their impressiveness and expense, this is a plant worth splurging on a quality grow light for, and setting up in a nice, sheltered spot. If you can position it to receive natural sunlight, it would absolutely love it, but you’ll have to be careful about exposure and sunburn if it’s a seasonal move.
In tropical or extremely humid climates, you can likely hang these outdoors in full shade and they would be happy as clams – if your nights stay warm. Experiment with your summers if you’re on the eastern US coast, and see if the increased natural light from being outdoors, along with longer days and natural humidity, helps your plant grow better.
For the rest of us with dry summers, skin-scorching sunlight and/or nights that are always colder than 65, you’ll have to figure out how to make indoors work. I use SolTech lights for my display plants in living areas, and have liked them so much that I’m budgeting for how to add them to my office and bedroom as well. The light quality is excellent, the plants thrive, and the fixtures are beautiful.
In my office, I use this behemoth hanging from the ceiling to light the table by the grow cabinet. It works well enough, although it’s certainly an eyesore. My Anthurium magnificums and Philodendron gloriosum are finally looking less like garbage plants and more like the elegant things they should be. My warocq is on a shelf near enough to benefit from the light, which is also true for my Ace of Spades Anthurium. The Ace of Spades grows and looks noticeably more impacted.
On the top of my shelves are these lights, which were a massive help to the strip LEDs we installed in the front lining of the cabinet. While we selected extremely bright LED strips that should have produced adequate lumens for the plants I was growing, their actual growth indicated that it was not nearly enough. Adding basic bright white lights with reflectors to the top of the shelves had a very dramatic and immediate effect on improving growth.
When it comes to indoor lighting, remember that artificial lights are always going to be somewhat underpowered as far as genuine lumens/foot candles produced unless you purchase dedicated grow lights for commercial operations. Lights used for growing food or marijuana are significantly more expensive, produce more light, and a lot more heat.
April 2024 update – If you don’t already have a light meter, you should get one. This one is the upgraded version of the one I still have.
Instead, look for measurements like this:

See that measurement for 3000 lumens? That means it outputs 3000 lumens of light.
That does not mean that your plant receives 3000 lumens. To determine how much your plant gets, you’d have to measure based on placement, including distance from the bulb, and how much of the bulb is actively focused on the plant. 3000 lumens isn’t much when it’s a strip light, but you can put two side by side (as I have) and create a nice, bright light that is very close to the level of light that equates to what nature would call bright, indirect light.

Ace of Spades with one light, adjacent to the large SANSI grow light but lower down. The display is set to indicate 10x, so add one zero to the end to get the Lux that this particular spot is receiving.
For the Ace of Spades with one grow light bar, some light from the SANSI, and some light from the strips in the front of the grow cabinet, it’s getting 3,620 lux or 330 foot candles for 12 – 14 hours a day. That is low to medium indirect light.

The warocq is up at the top, where there are two light bars, and is closer to them than the AoS. The SANSI is lower than this shelf, but still provides some ambient light.
This spot (note where my hand is, by the growth point of the warocq, not where the display is!) is at 6,230 lux, or over 570 foot candles for the same 12 to 14 hours a day. That’s solidly medium light intensity, bordering on bright indirect.
Comparisons like what I show above are what makes it worthwhile to have a light meter if you are determined to grow expensive or particularly finicky plants.
Knowing that epiphytes grow in branches, up higher in trees, where they likely receive dappled light and more of it than their ground-dwelling counterparts is a key reason why my epiphytic anthuriums are the top of my grow cabinet with a steady, bright source of light.
More lumens = more light being put out, but it doesn’t always mean that your plant will receive all of it. This is why if you type [number of lux] into Google and ask it to convert, it can only tell you foot candles. Lux and Foot Candles both refer to how much light a single spot is receiving. Lumens is the total amount the device is putting out.
It might help to think of it like spraying water. Lumens would be the water – say you have only 1 gallon to use. If you have it on a sprinkler, where it’s spread out wide, 1 gallon is barely going to make the top of the soil wet. By comparison, if you pour that entire gallon in a 4″ pot, you’ll drown the plant and have water overflowing, with nothing else but that one pot getting the water.
Your lux, or footcandles, is how wet the soil gets after the lumens hit it. Doesn’t matter if there’s 3000 lumens if it’s spread too far apart, right? The ground will be too dry for your plants. You can also completely overdo it if you focus all the lumens at one tiny spot, and the plant with too much will drown, while the rest dry out completely.
You need lumens as a measurement to tell you how much is being put out (and choose a lightbulb), but you need to measure the lux of your actual situation to determine if it’s enough.
Was this helpful?
Let me know! You can always message me on instagram, @TrexPlants. The shop here on the website is being updated regularly as I have seedlings and props available, and you can always inquire after specific plants directly by emailing me at jen@trexplants.com.
Thank you for reading!