Monstera Deliciosa – Thai Constellation
After dipping my toes into exotic tropical plants with my first Anthuriums in early 2019, I decided I’d try my hand with some truly “exotic” plants – naturally acquired through importing from a Thailand nursery, because that’s the totally logical next step.
If this logic seems weird to you, you’re right, it was weird. Monstera deliciosa is arguably one of the easiest monstera plants to grow out there, and in hindsight, importing plants in the middle of summer was a terrible idea. On top of that, velvet-leaf anthuriums (what I’d tried and successfully grown for a few months before trying to import plants) are actually harder to grow and care for than monsteras, so what was I even thinking…?
Anyway. It doesn’t matter. The plants arrived. My Thai constellation came in, along with a Monstera dubia and Monstera adansonii, because in August of 2019, finding swiss cheese plants was nearly impossible. This post will be about the Thai constellation, which is definitely one of the jewels of my current collection.
Care for Thai Constellation
Successful care for these is pretty simple, and pretty darn close to the same care needed for a regular Monstera deliciosa.
In its current spot, my Thai gets almost no direct sunlight. I keep it outdoors in a shady, protected side of the house, near a corner that’s facing north-west. Measuring the light output, it averages between 5000 and 5500 lux pretty consistently almost all day. Converted to foot candles, this is about 460 foot candles to 510 foot candles, and is about the middle of the range of ideal growing brightness for tropical foliage plants. I’ve let my regular monsteras stay out all winter in this growing area, even when we had nights that dropped down to the high 30s – but close to our house, I don’t think night time lows got much below 45. This year, I’ll find out, as I have a thermometer recording temperatures every minute in their area.
In summer, my monsteras are outdoors in temperatures up to 110F, although they are entirely protected from sunlight when temperatures are at their peak. During these heat waves, I noticed more growth and larger leaves, especially if I kept up on fertilizing.
When it’s hot and bright(90F+), I water my monsteras about every 2 or 3 days. When it’s warm and comfortable for humans (75 – 85F), it tends to be more like once a week, and when the daytime highs are below 75, it may be only once every few weeks.
Since I have my monsteras outdoors, humidity is at the mercy of our inland San Diego weather, which they don’t seem to mind. Since getting my thermometer/humidity gauge, they’ve done fine with daytime humidity dips into the teens. It’s important to note that the side of the house they’re on is also right next to our pool, and we get a cool nighttime breeze that regularly (but not always) brings in moist ocean air. The overall average humidity for my monsteras is about 53%, but it dips as low as 8% and goes up as high as 88%, depending on the time of day, heat, and whatever else may be happening.
My fertilization schedule is a bit haphazard; they get diluted fish emulsion about every 2 weeks during the warm growing season. Their soil blend also has worm castings, bone meal, and a cup or two of horticultural charcoal, which seems to be appreciated.
Once the roots became established, the plant has honestly been super forgiving of whatever I do to it. I have found it is definitely better to give them a little too little water than too much. Originally, I potted this in a large, attached-saucer pot my mom had given me for Christmas the year before, but the drainage wasn’t good enough and the soil stayed too soggy for too long. Its current plastic pot isn’t as pretty, but it definitely does the trick.
Care Journey: From Import to Specimen Plant
Normally, when you import plants from overseas, you want to have a few things on hand to give your new plants their best shot. A broad fungicide, for example, is usually a good idea since being in a box for days or weeks can encourage fungal growth even in a plant that was shipped in perfect condition. You also want to try and time your shipment for when weather is mild, and won’t roast your plants leaves. A phytosanitary certificate is a MUST – especially right now in 2020, with plenty of plant fever. There are a lot of plants being imported in smaller quantities and to people’s homes, so not only is a certificate necessary to legally import your plants, the post office is almost guaranteed to open your package and fry your plants without one.
When I received my shipment, we’d just had a heat wave in the 90 – 100F range for days on end, and my package was stuck up at the LA post office for 4 days. I was home to sign for the package (international shipments require this) and got them all immediately unpacked and in water..except for the thai, which arrived with a couple roots.
This is what it looked like the day I unpacked it (August 2019) – you can see its box buddies just to the right of it.
One of the original leaves was yellowed, but overall, it arrived in good shape, just a bit floppy and sad. I potted it straight into soil, which in hindsight, even with roots, I’d suggest acclimating your imports with a nice drink of water before potting them. Based on the other new plants I’ve acquired since this, you’ll see faster adjustment to your home, and have a better idea for root health and adjustment. If I was able to do this over again, I’d have it rooting in water, and once I saw new white root growth, I’d put it in soil at that point.
October, 2019
Fortunately, Monstera deliciosas are enormously forgiving, and in only a couple months, it’d produced a nice, shiny new leaf for me. At that point, I potted it into the pretty pot you can see in the photo above. That is also, sadly, the pot with an attached water saucer on the bottom. The hole at the bottom on the side was just plain inadequate drainage, and the plant definitely did not have enough roots to justify a pot that big yet.
In other mistakes I made, I also potted it too low, in a misguided idea that it’d put out more than one growth point.
Spoiler, that doesn’t work. Don’t be me.
April of 2020
As 2019 wrapped up, I brought the thai constellation into my home office with my grow lights to be pampered during the winter. This worked okay, but not super well, as the light wasn’t bright enough to encourage the same level of fenestration as the first new leaf it’d put out. As I’ve learned since then thanks to my handy-dandy light meter, this is because even under my grow lights, the lux / foot candles under the grow lights is maybe half what it was in the bright area of our junk room.
Also unfortunately, since the light wasn’t as strong or spread out as the plant liked, it kept growing and stretching toward the grow light…close enough that one day, the leaf closest to the light developed a nice big burn spot.
Whomp whomp.
May 2020
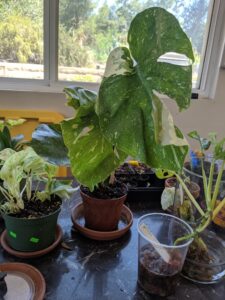
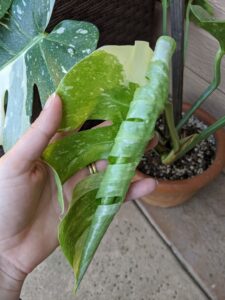
You’ll notice that by May, I’d re-potted it into a terra cotta pot, with a stick to tie it to…and it was outside. No more grow light for this bad boy, no sirree. Fresh soil and more light meant that it promptly started putting out new growth, which was very exciting! This barely unfurling leaf had more fenestrations and lovely variegation pattern.
July 2020
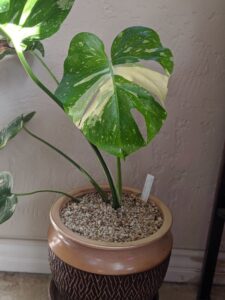
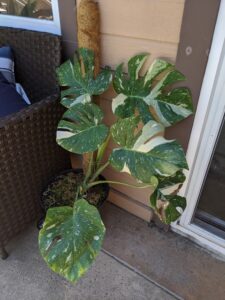
Couple months later, and oh look! Another new pot! It’s justified – the new pot had better soil I’d blended myself, along with a much better grow pole. If you look at the bottom right, you can see the scorched leaf from the grow light. The leaf at the front is one of the original leaves from when it was imported!
At this point I was pretty happy with the growth, and the new leaves coming out were bigger each time, with more fenestrations, and big splashy variegation that was super striking. It only took a year to figure out how to maintain it so it didn’t look pathetic!
Through May, June, and July it was getting fertilized pretty much every two weeks with diluted fish emulsion, and occasionally I’d dump in extra orchid fertilizer (very diluted) I was giving my anthuriums. Since it’s outdoors, I also sprayed for bugs with the same pesticide I was using for my food garden to protect against aphids, spidermites, and grasshoppers. AND I had a systemic pesticide mixed into the soil; I know that spider mites hit our tomatoes every year no matter what I do, and I made sure to set up my tropical outdoor plants for success against the onslaught. It worked – my thai (and other outdoor tropicals) didn’t get any pests this year.
 August 2020
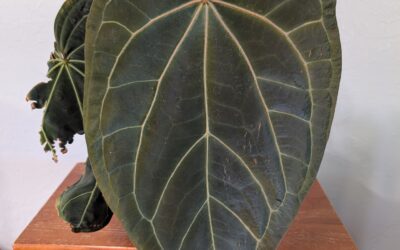
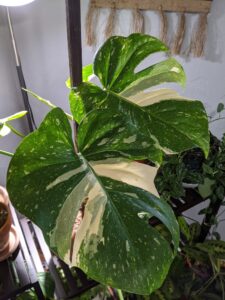
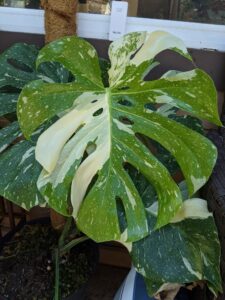
The latest leaf to come out has two layers of fenestrations, and is HUGE. The lighter green you see of this leaf compared to the older leaves behind it indicates that it was still growing at this time. When kept outdoors, I noticed my monsteras had distinct new growth color to their leaves that persisted up until they hardened off. I really like the color and variegation of the thai constellation, as it’s much hardier and the splashes of pale color don’t brown or burn like my white variegated plants do.
Since August, my thai hasn’t put out any more new leaves, but that’s not terribly surprising. Each leaf seems to take about a month or so to be produced and fully emerge, then harden, so taking a rest isn’t a surprise. As the weather gets cooler, I may pull it back inside…but my plan this year is to keep it outside and in the sheltered area it’s been in since May. I’ll update in spring with how it does!